I’m Victoria—mom, home cook, and the heart behind Moms Meals Daily. 💛 I was born and raised in a cozy, food-loving family where meals weren’t just about eating—they were about connection, comfort, and creating memories. From a young age, I found joy in the kitchen, helping my mom whip up simple, nourishing meals that brought everyone to the table. That love grew even stronger when I became a mom myself. Between juggling little ones, busy days, and the never-ending “What’s for dinner?” question, I realized I needed meals that were easy, nourishing, and real—and I knew other moms did too. That’s how Moms Meals Daily was born: out of a passion for sharing doable, everyday recipes that bring joy without the stress. Welcome to my kitchen! 🍽️✨
These little cups are the perfect example of that philosophy: maximum flavor for minimum effort. If you love discovering simple ways to feed your family with love, be sure to subscribe to my newsletter! You’ll get first access to all my easy, weeknight-friendly recipes.
Table of Contents
Overview of Recipe Content
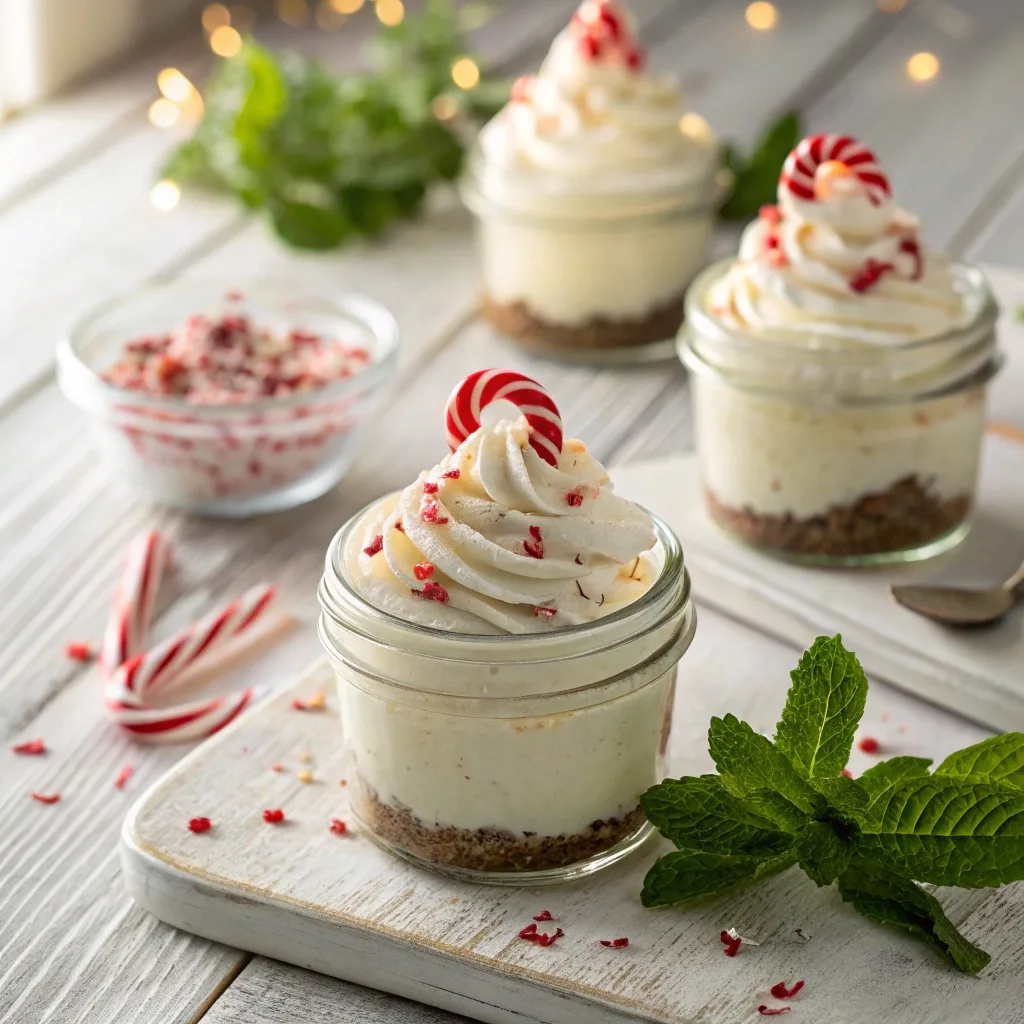
So, what exactly are we making? We’re taking the rich, velvety texture of a classic cheesecake filling, stirring in the cool, crisp flavor of peppermint, and nestling it into a crunchy, chocolatey Oreo crust—all portioned out into cute, ready-to-serve cups. They are an instant crowd-pleaser and are perfect for Christmas Eve, New Year’s Day brunch, or any casual holiday potluck.
Why You Will Be Delighted to Make These
- No Oven Required: This is truly the ultimate “set it and forget it” dessert. You escape the hot kitchen, saving precious oven space for your main course or side dishes.
- Built-in Portion Control: Serving desserts can be messy and stressful. These cups make it simple! Each guest gets a perfectly sized, beautiful dessert without you needing to slice a thing.
- The Perfect Holiday Flavor: The combination of sweet, tangy cream cheese, rich dark chocolate from the crust, and the blast of cool peppermint is the definition of holiday cheer. It truly tastes like Christmas in a cup.
What It Tastes Like
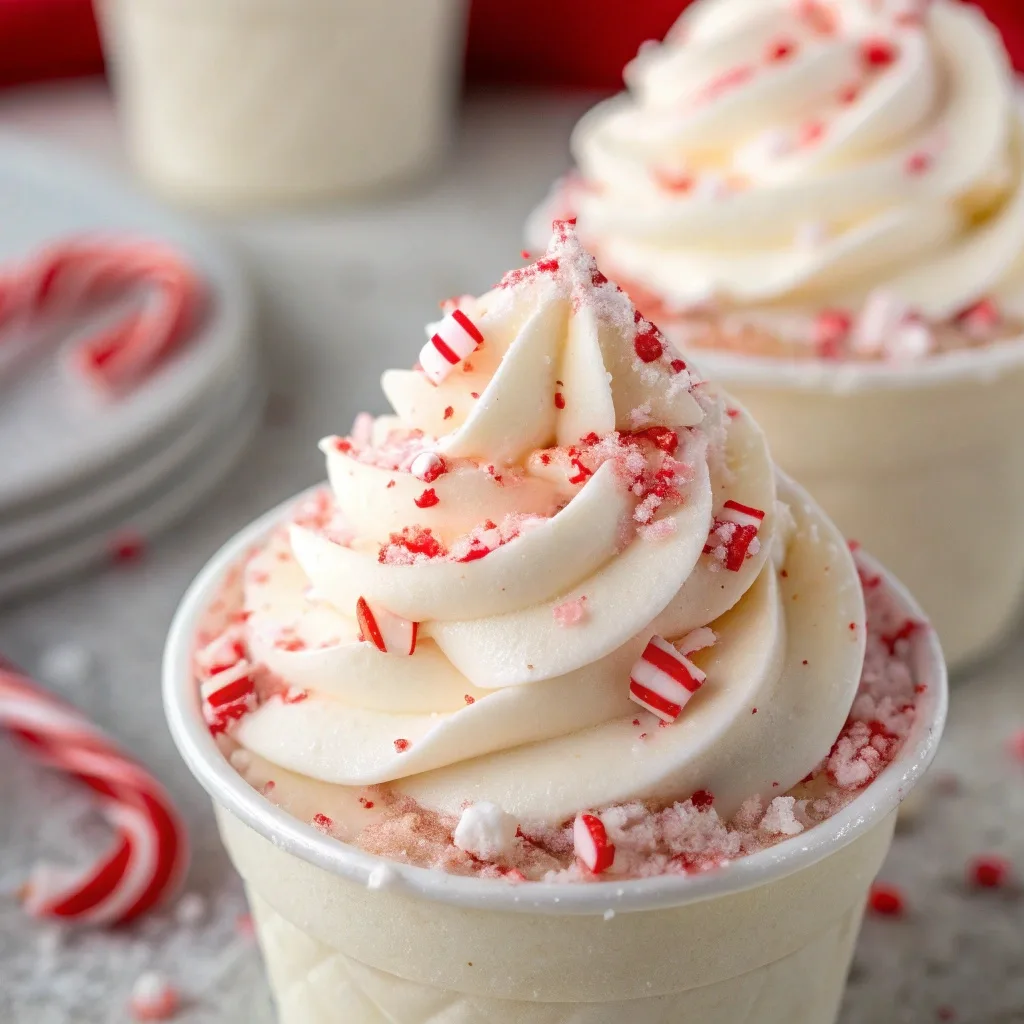
Imagine the moment you take that first spoonful: the smooth, creamy filling slides over your tongue, bringing a slight tang from the cream cheese, which quickly gives way to a sweet, refreshing burst of peppermint. The flavor is bright, not overpowering. Just beneath that, the crust offers a rich, deeply chocolatey crunch, contrasting beautifully with the softness of the filling. We top it all off with a pillow of fresh whipped cream and a generous shower of crushed candy canes for that satisfying texture.
Seasonal Benefits and Ease
This recipe shines in the winter months. Peppermint is a traditional holiday flavor, and because these cups must be served chilled, they are refreshing and easy to transport to parties without worry. The prep work is quick, requiring only a food processor and a stand mixer (or a hand mixer!), making cleanup a breeze.
Ingredients
This recipe uses a few simple, common ingredients to create a spectacular dessert. Remember to bring your cream cheese and butter to room temperature—this is a non-negotiable step for a perfectly smooth filling!
For the Chocolate Oreo Crust:
- 25 Oreo cookies (about 2 cups of crumbs, use the whole cookie—filling and all!)
- 4 tablespoons melted butter
For the Peppermint Filling:
- 16 ounces (two 8 oz packages) full-fat cream cheese, softened
- 1 cup powdered sugar
- ½ teaspoon pure peppermint extract (start here, you can add more later)
- A pinch of salt (always!)
- 1 cup heavy whipping cream, cold
- ½ cup finely crushed candy canes (plus more for topping)
- A few drops of red food coloring (optional, but gives a beautiful pink hue)
For the Topping:
- 1 cup heavy whipping cream, cold
- 2 tablespoons powdered sugar
- 1 teaspoon vanilla extract
- Extra crushed candy canes
Tools Needed
- 12 standard-size muffin liners (or cute dessert jars/ramekins)
- Standard 12-cup muffin tin
- Food processor or Ziploc bag and rolling pin (for crushing cookies)
- Electric hand mixer or stand mixer with a whisk attachment
- Large mixing bowls
- Rubber spatula
Substitutions and Additions
I love how forgiving this recipe is! Feel free to customize these No-Bake Peppermint Cheesecake Cups to fit your family’s tastes or what you have on hand.
- Crust Alternatives: You can use graham crackers or vanilla wafers instead of Oreos. Simply substitute them cup-for-cup and keep the butter amount the same.
- Cream Cheese: Please stick to full-fat cream cheese for the best texture. Low-fat varieties simply do not set up as firmly in a no-bake recipe.
- Peppermint Intensity: Not everyone loves a huge blast of mint. I recommend starting with ½ teaspoon of extract and giving it a taste test. If you want a more powerful punch, add a tiny splash more, tasting as you go!
- Chocolate Chip Swirl: Before pouring the filling into the cups, gently fold in a handful of mini chocolate chips for an added layer of flavor and texture.
How to Make No-Bake Peppermint Cheesecake Cups
Creating these creamy cups is a straightforward process, focusing on technique to get that perfect, fluffy texture. Let’s make some kitchen magic!
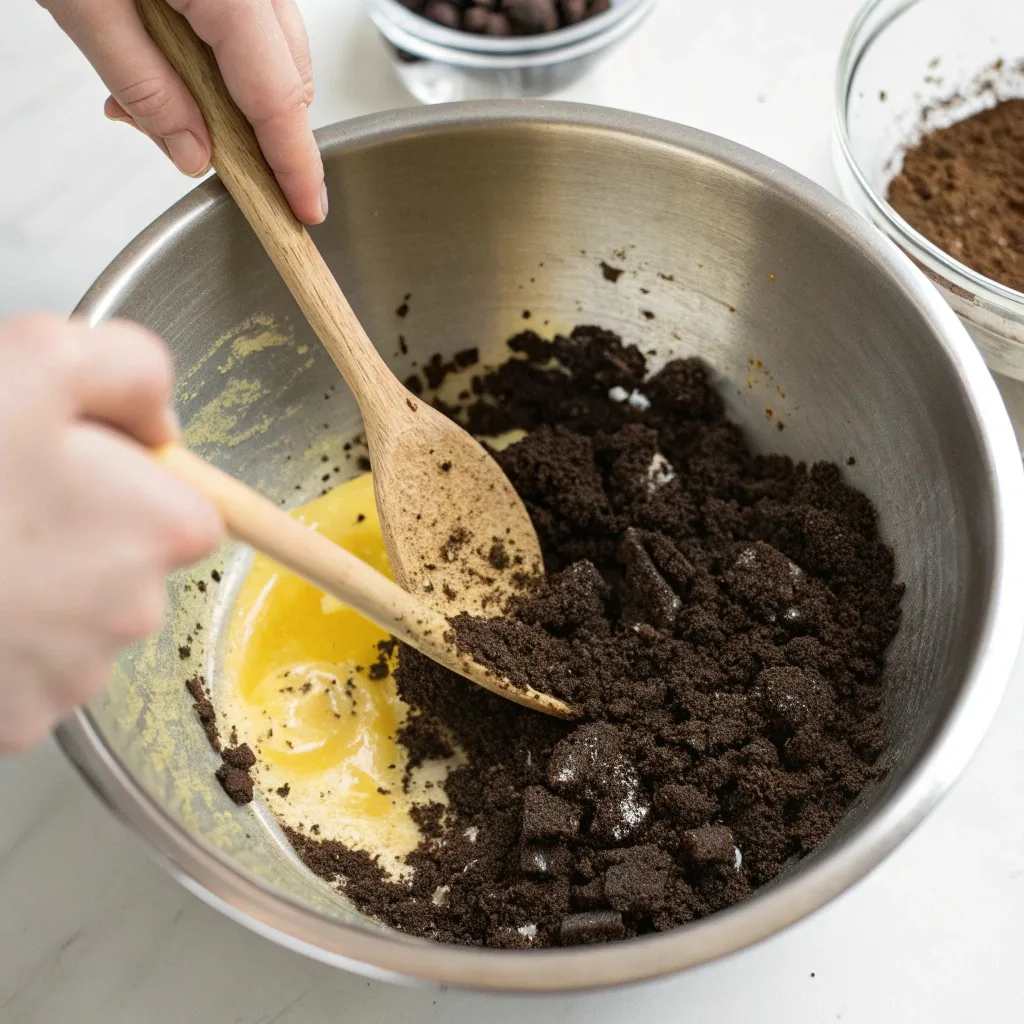
Step 1: Crush the Cookies and Make the Crust
You want your Oreo crumbs to be fine, like sand. If you have a food processor, just pulse the cookies until they are fully ground. If you don’t, place them in a Ziploc bag and let your kids use a rolling pin to smash them up! It’s a great way to let them help and burn off some holiday energy.
Once crushed, transfer the crumbs to a bowl and pour in the 4 tablespoons of melted butter. Stir it well until all the crumbs are evenly coated and feel like wet sand. Line your muffin tin with the paper liners. Scoop about 1 ½ tablespoons of the crumb mixture into the bottom of each liner. Now, here’s the key: pack it down. Use the bottom of a shot glass, a small measuring cup, or your fingers to firmly press the crumbs into a tight layer. Pop the whole tray into the refrigerator while you make the filling.
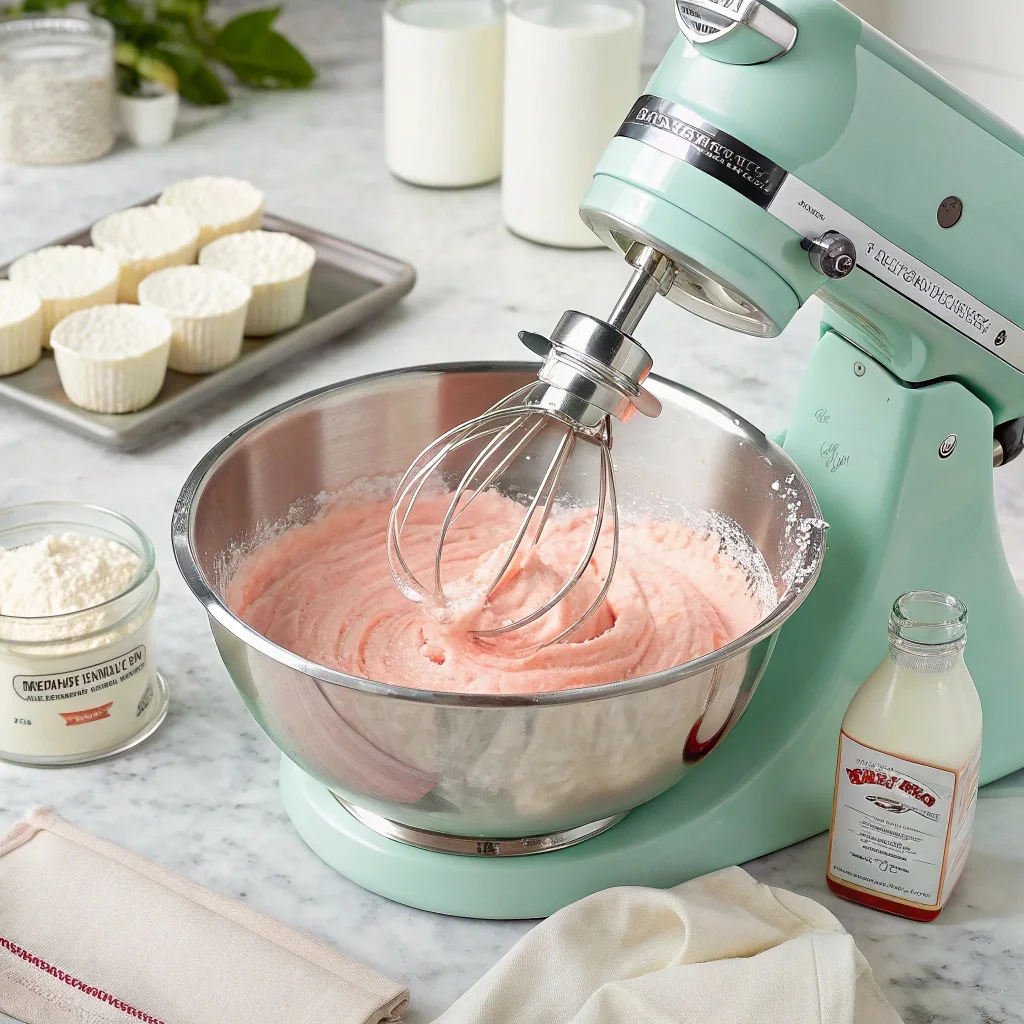
Step 2: Beat the Cream Cheese Filling
In your mixing bowl, beat the softened cream cheese until it is completely smooth—this should take about 2–3 minutes on medium speed. Stop the mixer often to scrape down the sides of the bowl. We are aiming for zero lumps! This step is crucial for that velvety, rich filling texture.
Next, add the powdered sugar, salt, and peppermint extract. Mix until just combined. If you want that classic holiday pink color, now is the time to add a couple of drops of red food coloring. Mix it in until the color is beautiful and uniform.
Step 3: Whip the Heavy Cream
In a separate, very clean bowl, pour in your cold heavy whipping cream. Use the whisk attachment on your mixer and whip the cream on high speed until it forms stiff peaks. You know it’s ready when you lift the whisk and the peaks stand up on their own, holding their shape sturdy and tall.
Step 4: Fold and Assemble
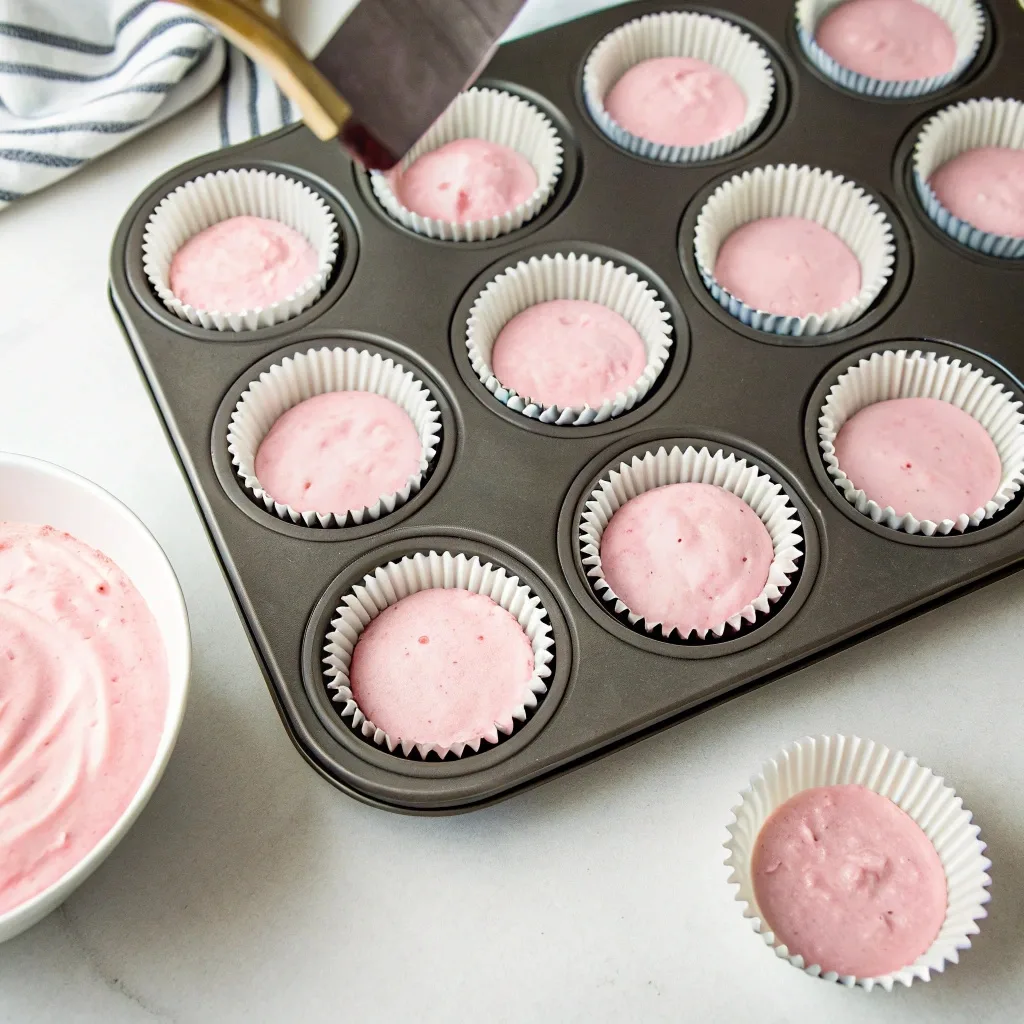
Take about a third of the whipped cream and gently fold it into the cream cheese mixture using a rubber spatula. This lightens the cream cheese base. Once that is integrated, gently fold in the remaining whipped cream and the crushed candy canes. Be gentle! We want to keep all that air we just whipped into the cream. Over-mixing here is a common pitfall; it makes the filling runny. The final texture should be light, airy, and wondrous.
Spoon or pipe the peppermint filling into the prepared crusts. I like to use an ice cream scoop for uniform sizes. Fill each cup almost to the top.
Step 5: Chill and Set
Return the muffin tin to the refrigerator. These No-Bake Peppermint Cheesecake Cups need at least 4 hours to chill, but I always recommend 6 hours or even overnight. This time lets the crust firm up and the filling properly set, giving you a perfect cheesecake consistency.
Step 6: Decorate and Serve
Before serving, whip up the remaining heavy cream with the powdered sugar and vanilla extract to create a fresh topping. Pipe a little swirl onto each chilled cup and shower them with extra crushed candy canes. Watch your guests’ faces light up as they spot the red and white sprinkles!
What to Serve with No-Bake Peppermint Cheesecake Cups
While these cups can certainly stand on their own as the star of your holiday dessert table, I love pairing them with simple, comforting drinks and dishes that complement the minty sweetness.
Drinks:
- The Best Ever Hot Chocolate Bar Recipe: Nothing beats a classic pairing. The richness of the chocolate and the warmth of the drink is the perfect cozy combination with the cool peppermint. ( 👉 Best Ever Hot Chocolate Bar Recipe)
- A simple glass of chilled milk or a mug of strong, black coffee.
Palate Cleanser/Starter:
- Something savory and light, like a fresh, crisp salad.
- For a flavorful and simple weeknight dinner that balances out the richness of this dessert, you must try my Weeknight Chicken and Veggie Sheet Pan
Tips for Making It Perfe
A few simple kitchen truths make all the difference when creating the ultimate no-bake dessert!
- Mind the Temperature: I said it before, but it bears repeating: Your cream cheese must be fully at room temperature. If it’s cold, it will create lumps, and no amount of beating will fix them.
- Peppermint Extract is Strong: Use pure peppermint extract, not mint extract, but use it sparingly. It’s far more concentrated than vanilla! Add a little, taste, and then add more if needed. You can’t take it out, but you can always add!
- Crush Candies Correctly: To avoid those sticky, half-melted candy cane bits, make sure the candy canes are completely dry when you crush them. Use a food processor for a fine texture, or a heavy rolling pin. Don’t fold them in until the very last minute before chilling.
- Make-Ahead Advice: These cups are a dream for make-ahead holiday hosting. You can make the cups completely, without the final whipped cream and candy cane garnish, up to 2 days in advance. Keep them tightly covered in the fridge. Garnish right before serving for the freshest look.
Storage Instructions
These No-Bake Peppermint Cheesecake Cups store wonderfully, making them an ideal recipe for batch cooking.
- How to Store: Once fully set, you can remove the cups from the muffin tin and store them in an airtight container in the refrigerator for up to 4 days. If they already have the whipped cream topping, they will still keep, but the whipped cream may start to weep after 2 days.
- How to Freeze: You can absolutely freeze these! Prepare the cups up to Step 5 (before the final whipped cream topping). Place the tray in the freezer until the cups are frozen solid, about 2 hours. Then, transfer the frozen cups to a freezer-safe, airtight container. They will keep beautifully for up to 1 month.
- How to Reheat (Thaw!): To serve, simply remove the frozen cups from the freezer and place them back in the refrigerator for 4–6 hours to thaw. Garnish with fresh whipped cream and candy canes just before you are ready to serve them.
General Information
Peppermint is an ancient flavor, used for centuries, but its starring role in American holiday desserts is a relatively modern tradition. Peppermint candies—particularly the red and white striped cane—became firmly associated with Christmas in America around the turn of the 20th century. Bakers started pairing the crisp, cool flavor with rich chocolate and cream cheese, creating favorites like this one.
These cups offer a nod to that tradition, taking the timeless holiday pairing of chocolate and peppermint and simplifying it. I grew up with my grandmother always making a huge, complicated layered cake for Christmas dinner. She worked herself ragged! These cups honor the spirit of that wonderful dessert without the time commitment. They let you spend your time where it belongs—laughing with family.
Frequently Asked Questions
Can I use store-bought whipped topping instead of fresh whipped cream?
Why did my filling turn out runny?
1) Your cream cheese wasn’t soft enough, creating lumps that prevented proper emulsification,
2) You overmixed the filling after adding the whipped cream. Remember, folding in the whipped cream is a gentle process designed to keep the air in!
Can I skip the food coloring?
Is it possible to make this into a full pie instead of cups?
Can I make the crust with gluten-free cookies?
Conclusion
These No-Bake Peppermint Cheesecake Cups are a holiday miracle. They capture the spirit of the season in every creamy, minty bite without demanding hours of your precious time. They are the perfect way to show your love and hospitality, and your guests will appreciate the built-in portion size and fabulous flavor! Remember to save this recipe and share it with a friend who needs a little less oven time this year.
Interactive Elements
Did you make these No-Bake Peppermint Cheesecake Cups? I’d love to hear how they turned out! Leave a comment below with your thoughts, or tag me in a photo of your beautiful creations on Pinterest!
Follow Moms Meals Daily on Pinterest
Happy cooking, friends!

Emily brings four years of dedicated baking experience and professional pastry-focused training to Moms Meals Daily. She oversees recipe validation and quality control to ensure every dessert performs consistently and reliably.
Victoria Recipe | Easy Desserts & Dessert Recipes
Easy & Delicious Recipes
Follow for quick family-friendly recipes, baking inspiration, and comfort food favorites.
Follow on Pinterest