
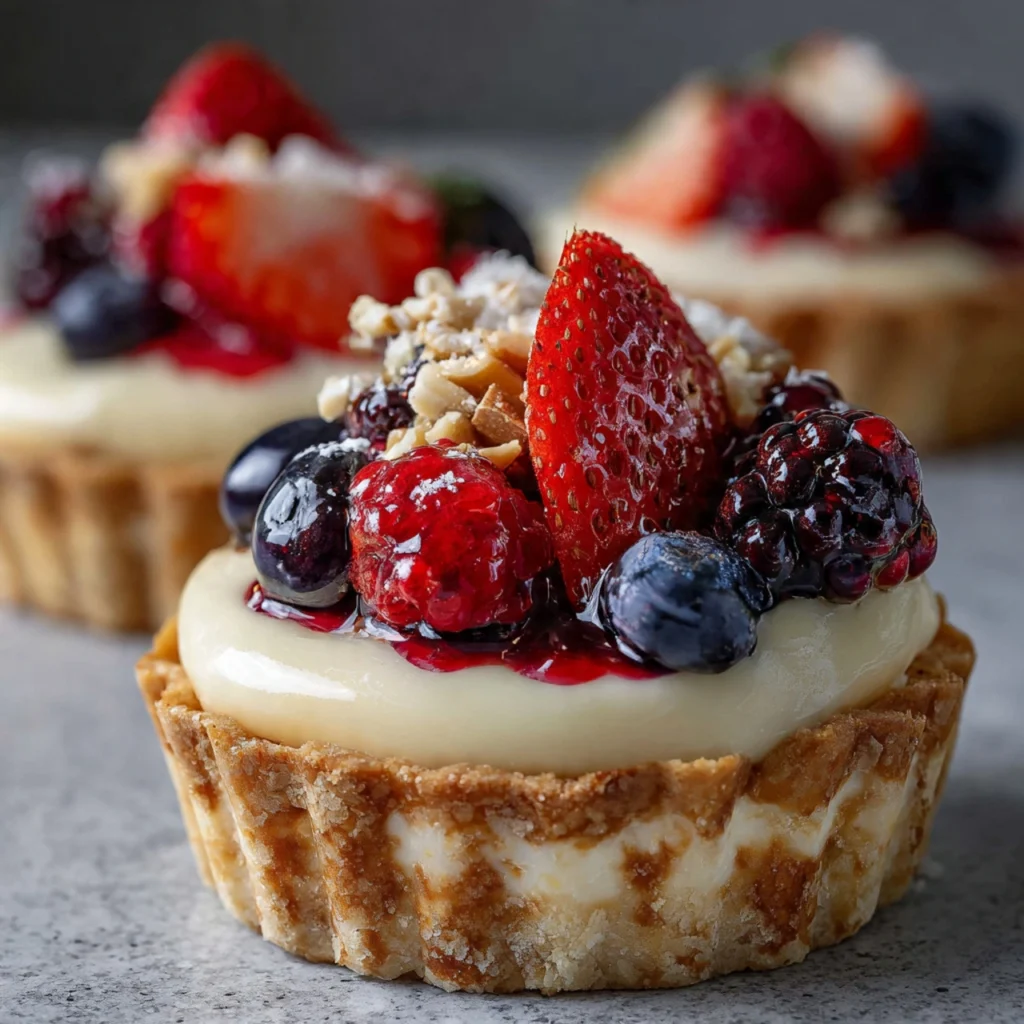
Thanks for being here! I’m so excited to share this delightful recipe for White Chocolate Berry Tartlets with you. As a chef, I treasure the moments spent in the kitchen, especially when it involves creating something sweet to enjoy with those I love. These adorable tartlets are not just perfect for Valentine’s Day—they fit beautifully into any gathering or cozy night in. With a velvety white chocolate filling and a burst of fresh berries, they hold a special place in my heart and on my table.
Table of Contents
Overview of Recipe Content
These White Chocolate Berry Tartlets are a delicious blend of creaminess and fruity freshness. They are best served as a dessert for Valentine’s Day or any other special occasion where you want to impress your guests. The creamy white chocolate filling perfectly complements the sweet-tart berries, making each bite a heavenly experience. Readers will love this recipe because it’s quick and relatively easy, yet the results look stunning and taste amazing. Plus, with the bright colors and flavors, they bring a taste of summer into your kitchen, no matter the season!
Ingredients
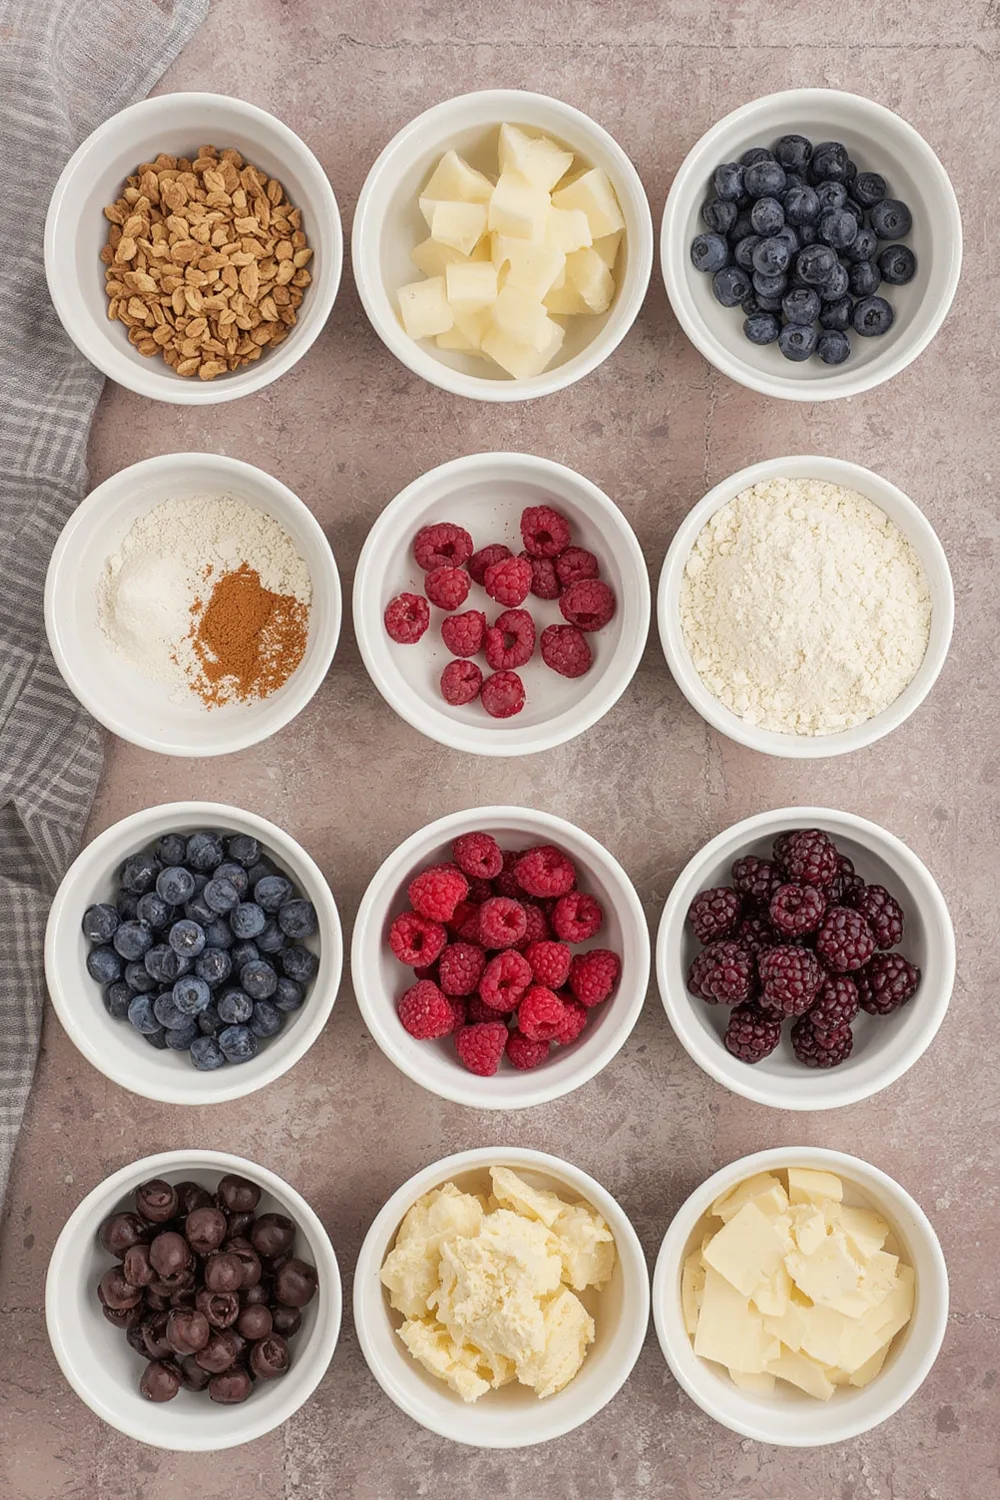
- 1 ½ cups all-purpose flour
- ½ cup unsalted butter, softened
- ¼ cup powdered sugar
- 1 large egg
- 1 teaspoon vanilla extract
- 1 cup white chocolate chips
- ¾ cup heavy cream
- 2 cups mixed fresh berries (strawberries, raspberries, blueberries)
- Fresh mint leaves for garnish (optional)
Tools Needed
- Mixing bowls
- Tartlet pan or muffin tin
- Whisk
- Rubber spatula
- Measuring cups and spoons
- Double boiler or microwave-safe bowl
- Plastic wrap
Suggested Substitutions and Additions
- Use almond flour for a gluten-free version
- Substitute dark chocolate for a richer flavor
- Swap out fresh berries for seasonal fruits like peaches or figs
- Add a splash of lemon juice to the cream for a zesty twist
- Experiment with flavored extracts like orange or almond
How to Make
Step 1: Make the Tartlet Crust
Start by preheating your oven to 350°F (175°C). In a mixing bowl, combine the softened butter and powdered sugar. You’ll know you’re on the right track when the mixture is smooth and creamy—almost like a fluffy cloud! Next, add in the egg and vanilla extract, mixing until just combined.
Now, gently fold in the flour. You want everything to come together without overworking it—this will keep your tartlet crust delightfully tender. Your dough should be slightly sticky but manageable.
Once your dough is ready, lightly flour a clean surface and roll the dough to about ¼ inch thickness. Cut out circles to fit your tartlet or muffin pan. Press the circles into the greased pan (don’t worry about perfection—rustic is charming!). Prick the bottoms with a fork to prevent bubbling. Bake them for about 12-15 minutes until they’re lightly golden.
Step 2: Prepare the White Chocolate Filling
While your crusts are cooling, it’s time to melt that luscious white chocolate. You can do this in a double boiler or microwave in short intervals to avoid scorching. If using the microwave, heat in 30-second increments, stirring until smooth.
In another bowl, whip the heavy cream until soft peaks form. Gently fold the melted white chocolate into the whipped cream until combined. It will look so smooth and shiny; you’ll be tempted to dip your finger in!
Step 3: Assemble the Tartlets
Once your tartlet shells have completely cooled, this is where the magic happens! Spoon the white chocolate filling into each crust, spreading it evenly. Top with a generous mixture of your fresh berries, letting their vibrant colors peek through.
For an extra touch, you can drizzle a bit more melted white chocolate on top and then add a sprinkle of powdered sugar—it’s all about those presentation points!
What to Serve with White Chocolate Berry Tartlets
These tartlets can be enjoyed solo, but they’re also wonderful paired with:
- A scoop of vanilla ice cream or whipped cream for added creaminess
- A glass of sparkling rosé or lemonade for a refreshing drink
- Fresh mint leaves on top for an aromatic touch
If you’re looking for more dessert inspiration, check out my Chocolate Lava Cakes or my delightful Strawberry Shortcakes for that perfect sweet ending to any meal!
Tips for Making It Perfect
- Prep the tartlet crust and filling ahead of time. You can bake the tart shells and store them in an airtight container for up to two days before adding the filling.
- To fix a common crust issue, if your crusts crack a bit, press them together gently once they’ve cooled.
- If you’ve got extra filling, consider making mini cups in a silicone mold for a bite-sized treat.
- Feel free to double the recipe if you’re serving a crowd—the tartlets freeze wonderfully before adding the filling; just thaw them overnight in the fridge before serving!
Storage Instructions
These tartlets are truly best enjoyed fresh, when the crust is crisp and the filling is at its most flavorful and vibrant. Freshly assembled tartlets offer the perfect balance of texture and taste, making each bite especially satisfying. However, if you happen to have leftovers or want to prepare parts of the recipe in advance, they can certainly be stored with a bit of care.
For short-term storage, keep any leftover tartlets in an airtight container in the refrigerator for up to two days. This helps maintain their freshness while protecting them from absorbing unwanted odors. Keep in mind that the crust may soften slightly as it sits, but the flavors will still be delicious.
If you’d like to freeze them for longer storage, it’s best to freeze the components separately rather than fully assembled. The tart shells can be frozen for up to three months when stored in a freezer-safe container, preserving their structure and crispness. The filling can also be frozen on its own for about two weeks. When you’re ready to serve, simply thaw the components in the refrigerator and assemble the tartlets just before enjoying them for the best possible texture and presentation.
General Information
Tarts and tartlets have a rich history that dates back to the medieval kitchens of Europe, where they were used as a way to showcase seasonal fruits. This recipe marries the classic tart style with a rich white chocolate filling, bringing together both tradition and innovation. Personally, I love making these during special occasions, reminding me that the simplest joys in life are those spent with family and friends.
Frequently Asked Questions
- Can I use frozen berries instead of fresh?
Yes, you can use frozen berries, but thaw them first and drain excess liquid to avoid sogginess.
- How long can I store leftovers?
Leftover tartlets are best consumed within two days if stored in the refrigerator.
- What if my tart crust is too crumbly?
If your crust isn’t holding together, try adding a tiny bit more butter or chilling it before reshaping.
- Can these be made dairy-free?
Absolutely, use dairy-free white chocolate and coconut cream for the filling.
Conclusion
These White Chocolate Berry Tartlets are a delightful blend of smooth, sweet, and tangy flavors that make any occasion feel special. Whether you’re serving them for Valentine’s Day or a charming dessert for friends, they are sure to impress. Don’t forget to check out my other tasty treats like the No-Bake Cheesecake or my fun Valentine’s Day Cookies for even more ideas!
Thank you for spending this time with me, and I can’t wait to see you try out this recipe. Happy baking!
Interactive Elements
I’d love to hear about your baking adventures! Please leave a review or comment below, and don’t forget to share your stunning tartlet photos on Pinteres: . Tag me on Instagram so I can see your beautiful creations!
Nutritional Information
Approximate Nutrition per Tartlet:
Calories: 210
Protein: 3g
Fat: 15g
Carbohydrates: 19g
Sugars: 8g
Fiber: 1g
Enjoy these scrumptious tartlets, and happy baking!

Emily brings four years of dedicated baking experience and professional pastry-focused training to Moms Meals Daily. She oversees recipe validation and quality control to ensure every dessert performs consistently and reliably.
White Chocolate Berry Tartlets
By Emily Hart
Ingredients
Instructions
Tools Needed
Save this recipe for later ❤️
Follow @mommealsdaily on Pinterest for easy dinners, desserts, and weekly inspiration.
Victoria Recipe | Easy Desserts & Dessert Recipes
Easy & Delicious Recipes
Follow for quick family-friendly recipes, baking inspiration, and comfort food favorites.
Follow on Pinterest