Thanks for being here! I’m truly excited to share this delightful Spring Confetti Dirt Cups recipe with you! As a seasoned chef, I’ve always had a soft spot for desserts that evoke childhood nostalgia and bring a smile to everyone’s face. These dirt cups are special because they encapsulate the essence of springtime and the joy of Easter celebrations. The colorful layers of crushed cookies and creamy filling make them an absolute crowd-pleaser. Plus, they are quick to prepare and perfect for any festive occasion. I can’t wait for you to try this delightful treat with family and friends!
Table of Contents
Overview of Recipe Content
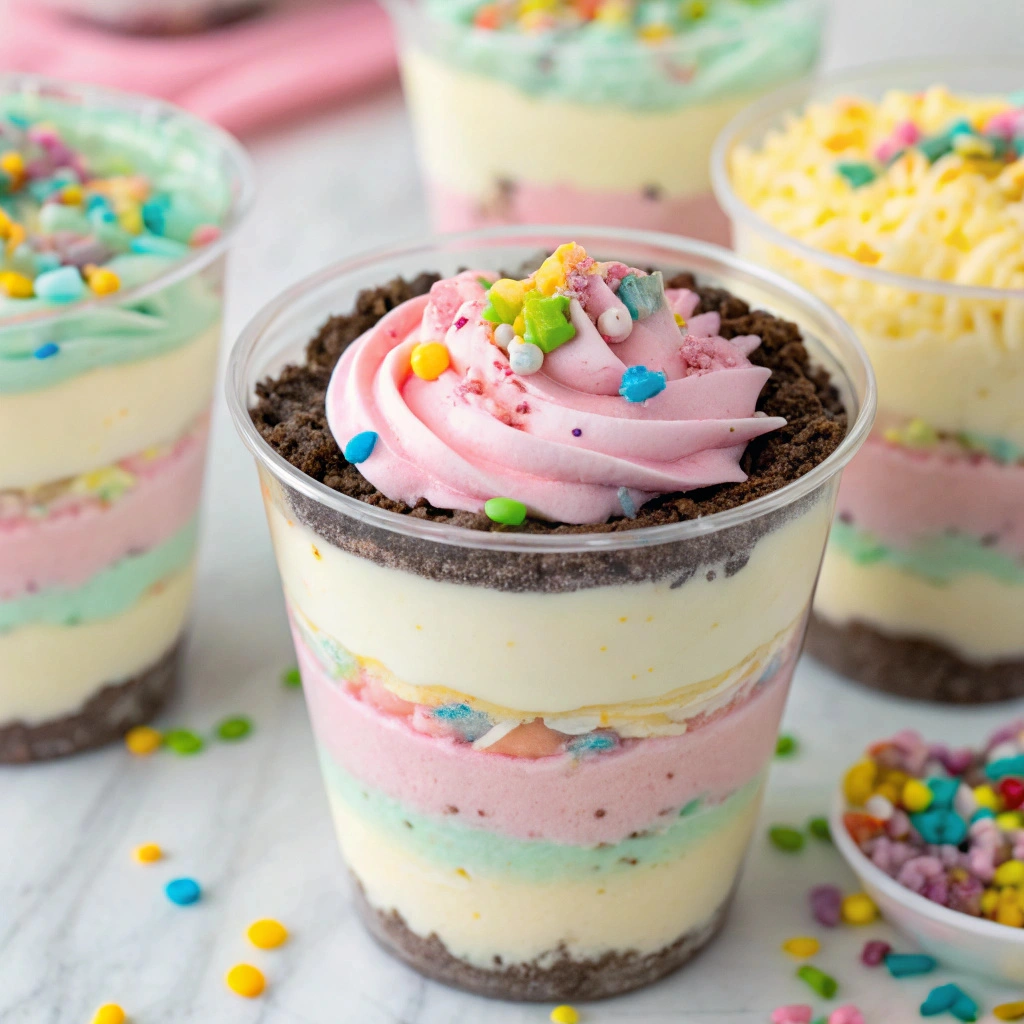
This Spring Confetti Dirt Cup recipe is a playful twist on the classic dirt cup, featuring layers of crumbled cookies, fluffy pudding, and cheerful pastel colors. Serve these at birthday parties, Easter gatherings, or even as a fun treat on a sunny afternoon. Each cup bursts with delightful flavors, combining the crunch of cookies with the creaminess of pudding and the sweetness of whipped cream.
Why will you love this recipe? It’s quick to make, caters to both kids and adults, and lends itself to creativity with different toppings and flavors. With seasonal ingredients and charming presentations, these dirt cups not only satisfy your sweet tooth but also add a splash of color to your spring festivities. Plus, if you’re keen on a lighter dessert option, they can easily be made healthier with some simple ingredient swaps!
Ingredients

- 1 package (15.35 ounces) chocolate sandwich cookies
- 2 packages (3.4 ounces each) instant vanilla pudding mix
- 4 cups cold milk
- 1 package (8 ounces) cream cheese, softened
- 1 cup powdered sugar
- 1 container (8 ounces) whipped topping (like Cool Whip)
- ½ cup gummy worms or other candy for topping
- Edible confetti sprinkles
- Optional: food coloring for more vibrant pudding
Tools Needed
- Mixing bowls
- Electric mixer or whisk
- Measuring cups and spoons
- Rubber spatula
- Clear plastic cups or dessert cups
- Food processor or rolling pin (for crushing cookies)
Suggested Substitutions and Additions
- Use Greek yogurt instead of cream cheese for a healthier option.
- Substitute chocolate pudding mix for vanilla to switch up flavors.
- Use crushed graham crackers instead of chocolate cookies for a different base.
- Add fresh fruit like strawberries or sliced bananas between the layers for extra freshness.
- Substitute almond milk for regular milk for a dairy-free version.
How to Make
Step 1: Crush the Cookies
Start by placing the chocolate sandwich cookies in a food processor, then crush them into fine crumbs. If you don’t have a food processor, you can place them in a zip-top bag and crush them with a rolling pin. You should be left with a dust-like consistency. You’ll know it’s perfect when it starts to smell like chocolate heaven!
Step 2: Prepare the Pudding
In a mixing bowl, combine the instant vanilla pudding mix and cold milk. Use an electric mixer to whip it together until it thickens; this will take about 2 minutes. You’ll know it’s ready when it holds its shape and resembles a thick custard. For added fun, consider adding a drop or two of food coloring to make the pudding more festive.
Step 3: Make the Cream Cheese Mixture
In a separate bowl, beat the softened cream cheese with powdered sugar until smooth and creamy. If you want a little extra sweetness, you can add a tablespoon of vanilla extract. Fold in the whipped topping gently until well combined.
Step 4: Layer the Ingredients
In your clear plastic cups, start layering the dessert. Begin with a layer of crushed cookies, followed by a layer of the cream cheese mixture, then a layer of pudding. Repeat these layers until the cups are filled, finishing with a sprinkle of cookie crumbs on top. Don’t forget to add those gummy worms and edible confetti sprinkles for that extra fun touch!
Step 5: Chill and Serve
Once your cups are assembled, refrigerate them for at least one hour before serving. This chilling step allows all the flavors to meld beautifully together, and it’ll give the pudding time to set up perfectly.
What to Serve with Spring Confetti Dirt Cups
These Spring Confetti Dirt Cups stand well on their own, but if you’re looking to create a festive spread, consider pairing them with:
- A light fruit salad for freshness.
- Classic Easter dishes like glazed ham or deviled eggs for a savory contrast.
- Refreshing drinks such as lemonade or iced tea to balance the sweetness.
- Check out my recipe for “Spring Fruit Tart” for another delightful sweet treat!
Tips for Making It Perfect
- Prep in advance: You can make the cookie crumbs and pudding a day ahead to save time.
- If your pudding seems lumpy, simply whisk it a bit more until smooth.
- Make it ahead: These dirt cups can be made up to 24 hours in advance, so they’re perfect for prepping for parties!
- If you want to make a larger batch, double all the ingredients and use larger cups for serving.
Storage Instructions
These Spring Confetti Dirt Cups can be stored tightly covered in the refrigerator for up to 3 days. If you have leftovers, make sure to keep them chilled. I wouldn’t recommend freezing them, as the consistency can change after being thawed. Simply enjoy them fresh!
General Information
Dirt Cups originally gained popularity as a whimsical dessert for children, often featuring crushed Oreos and gummy worms to mimic a fun garden scene. The idea of edible dirt brings a playful charm, making it perfect for festive occasions like Easter or springtime gatherings. I have fond memories of making these with my family, layering the cups with laughter and creativity—what a treat! Each scoop transports me back to those special moments, and I hope these cups do the same for you and your loved ones.
Frequently Asked Questions
Can I swap out the cookies for another type?
- Absolutely! Feel free to experiment with different cookies like vanilla wafers or even gluten-free options.
How long do the dirt cups last in the fridge?
- They will be good for about 3 days when stored properly in the refrigerator.
What can I do if my pudding isn’t thickening?
- Make sure you’re using instant pudding, and mix thoroughly for the full 2 minutes. If it still doesn’t thicken, your milk might have been too warm, so be sure it’s cold.
Can I adapt this recipe for dietary restrictions?
- Yes! Use dairy-free cream cheese and a dairy-free alternative for the whipped topping and pudding for a vegan option.
Conclusion
These Spring Confetti Dirt Cups are not only adorable but also bring a sense of playfulness to any gathering. With their layers of creamy goodness and delightful crunch, they stand out as a bestseller for spring sweet treats. They are perfect for Easter celebrations or any cheerful occasion, and I think you’re going to love how simple yet impressive they are. For more cozy recipes like this, be sure to check out my “Easter Bunny Cupcakes” and “Spring Fruit Tart“—both delightful options that promise to brighten up your celebrations!
If you love cozy recipes like this, subscribe to my email list!
Interactive Elements
I would love to hear how your Spring Confetti Dirt Cups turn out! Please leave a review or comment below. If you share a photo on Pinterest. Also, don’t forget to tag me on Instagram—I can’t wait to see your creative spins on this recipe!
Nutritional Information
Approximate calories and macros per serving:
| Nutritional Information | Per Serving |
| Calories | 320 |
| Total Fat | 15g |
| Saturated Fat | 7g |
| Cholesterol | 30mg |
| Sodium | 200mg |
| Carbohydrates | 47g |
| Dietary Fiber | 1g |
| Sugars | 27g |
| Protein | 4g |
Enjoy making these delightful Spring Confetti Dirt Cups, and happy baking!

Emily brings four years of dedicated baking experience and professional pastry-focused training to Moms Meals Daily. She oversees recipe validation and quality control to ensure every dessert performs consistently and reliably.
Spring Confetti Dirt Cups
By Emily Hart
Ingredients
Instructions
Tools Needed
Save this recipe for later ❤️
Follow @mommealsdaily on Pinterest for easy dinners, desserts, and weekly inspiration.
Victoria Recipe | Easy Desserts & Dessert Recipes
Easy & Delicious Recipes
Follow for quick family-friendly recipes, baking inspiration, and comfort food favorites.
Follow on Pinterest