There’s something magical about desserts that come together effortlessly, especially when they bring back sweet memories from childhood. Today, I’m so excited to share with you my No Bake Oreo Cheesecake Bars, a recipe that captures both nostalgia and simplicity in every delicious bite. This treat has always been a favorite in my family, a go-to for gatherings and celebrations, serving as both a nostalgic reminder of happy moments and a delightful way to wrap up a meal.
Table of Contents
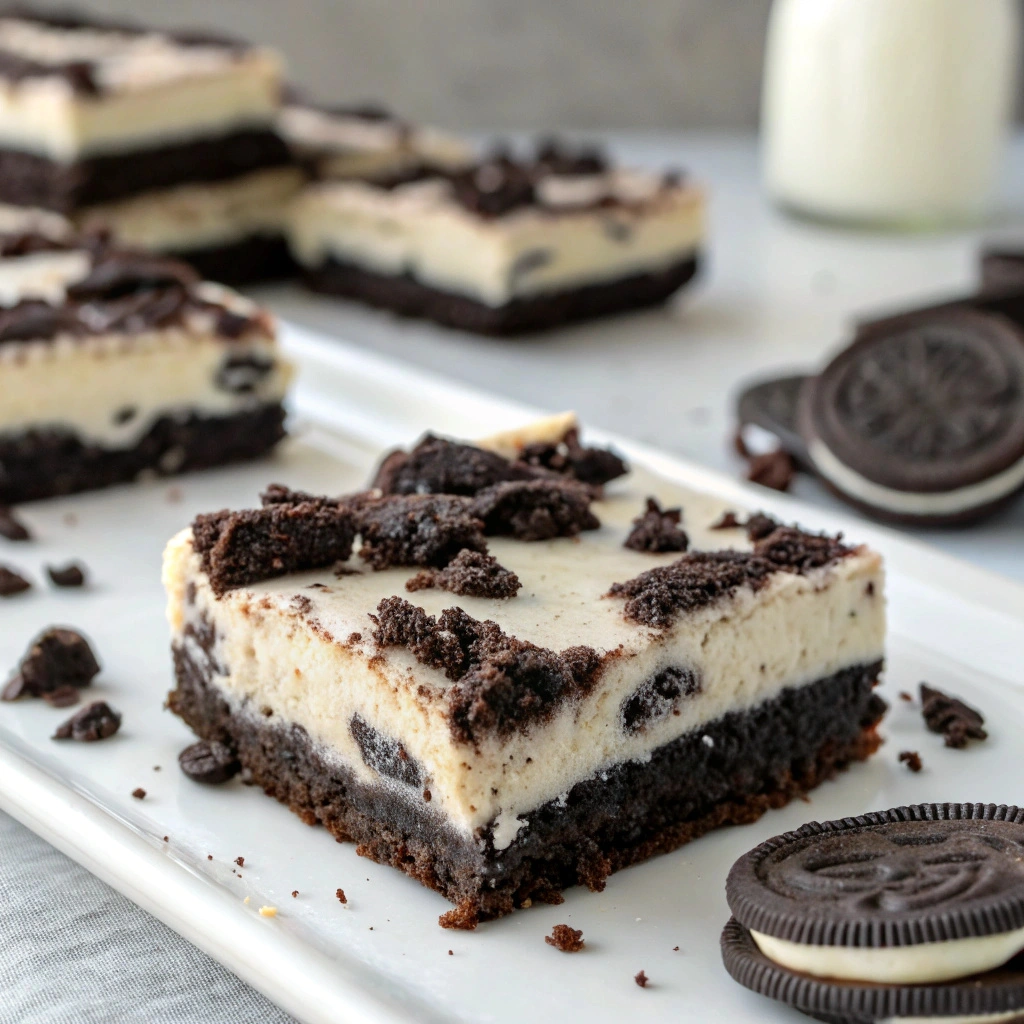
Picture this: creamy, decadent cheesecake meets the classic crunch of Oreos. The combination of velvety filling and the slight crunch of the crust makes for an inspiring blend of textures, leaving you wanting more with each bite. The creamy filling, infused with that unmistakable Oreo flavor, melts in your mouth, leaving a sweet satisfaction that’s hard to resist. If you love cozy recipes like this, subscribe to my email list!
Overview of Recipe Content
This recipe for No Bake Oreo Cheesecake Bars is a fun and easy dessert that you can whip up in no time, making it perfect for bake sales, potlucks, or a sweet treat at home. Best served chilled, these bars boast a rich, creamy filling encased in a crunchy Oreo crust. The flavor is a delightful fusion of chocolate and cream cheese, creating a dessert that is both indulgent and approachable.
What’s not to love? This recipe is quick, comforting, and incredibly customizable, allowing you to experiment with flavors while keeping it simple with just a few ingredients. It’s a true crowd-pleaser that seems to hit all the right notes, making it perfect for warm summer evenings or cozy family gatherings year-round.
Ingredients

To craft these dreamy No Bake Oreo Cheesecake Bars, you’ll need the following ingredients:
For the Crust:
- 24 Oreo cookies, finely crushed
- ½ cup unsalted butter, melted
For the Cheesecake Filling:
- 2 (8-ounce) packages cream cheese, softened
- 1 cup powdered sugar
- 1 teaspoon vanilla extract
- 2 cups whipped topping (like Cool Whip)
For Topping:
- 4-6 Oreo cookies, crushed (for garnish)
Tools Needed
Before diving into the recipe, ensure you have the following kitchen tools ready:
- Mixing bowls
- 9×9-inch baking dish
- Electric mixer or whisk
- Rubber spatula
- Measuring cups and spoons
Suggested Substitutions and Additions
Feeling adventurous? Here are some substitutions and additions to make this recipe your own:
- For a gluten-free option, swap out Oreos for gluten-free chocolate sandwich cookies.
- Use dairy-free cream cheese and whipped topping for a vegan version.
- Mix in melted chocolate or peanut butter into the cheesecake filling for an added flavor twist.
- Add a layer of chocolate ganache on top for extra decadence.
- Swap crushed Oreos for graham crackers in the crust for a different texture.
How to Make
Step 1: Prepare the Crust
Begin by crushing the Oreo cookies until they resemble a fine crumb. You can use a food processor or simply place them in a zip-top bag and crush them with a rolling pin. Add the melted butter to these fine crumbs, mixing them until they resemble wet sand. The aroma of crushed chocolate cookies fills the air, igniting a sense of excitement.
Firmly press this mixture into the bottom of your greased baking dish using a flat-bottomed glass or spatula. Achieving an even layer is important to ensure a solid base for your filling. Place it in the refrigerator while you prepare the filling.
Step 2: Make the Creamy Filling
In a large mixing bowl, beat the softened cream cheese until smooth, using an electric mixer on medium speed. As you mix, the texture becomes fluffy and light, a sign that you’re on the right track. Gradually add the powdered sugar, mixing until well-blended. The sweetness of the icing sugar adds a touch of sweetness and balance to the tangy cream cheese.
Next, add the vanilla extract, stirring until combined. Carefully fold in the whipped topping until no streaks remain visible. The mixture should become wonderfully creamy and luscious, with a lightness that beckons you to taste just a little bit.
Step 3: Combine and Chill
Pour the creamy cheesecake filling over the Oreo crust, spreading it evenly with a spatula. The contrast of the chocolate crust and creamy filling is simply divine, creating a dessert that’s both inviting and sumptuous.
Top with crushed Oreo cookies for that delightful crunch and extra flavor. finally, cover with plastic wrap or aluminum foil and chill in the refrigerator for at least 4 hours, or overnight if you can wait.
What to Serve with No Bake Oreo Cheesecake Bars (Creamy & Easy Dessert)
These bars are versatile and delightful on their own, but here are some suggestions to elevate your dessert experience:
- Pair with fresh strawberries or raspberries for a pop of color and tartness that balances the rich sweetness.
- Serve alongside a scoop of vanilla ice cream for extra creaminess.
- Sip on a chilled glass of milk as it perfectly complements the Oreo flavor.
If you’re looking for more delightful desserts, consider trying my Chocolate Chip Cookie Skillet or Peanut Butter Brownie Bites. Both are sure to impress!
Tips for Making It Perfect
Expert Tip 1: Allow the cream cheese to soften properly at room temperature before mixing to achieve a smooth texture.
Expert Tip 2: Don’t skip the chilling step! This allows the bars to set properly, making them easier to cut and serve.
Expert Tip 3: If your crust seems crumbly, add a touch more melted butter to help it adhere better.
Expert Tip 4: Use a sharp knife dipped in hot water to cut clean slices for perfect squares without crumbling.
Expert Tip 5: For make-ahead convenience, prepare these bars a day in advance; they taste even better as the flavors meld together!
Storage Instructions
To keep these No Bake Oreo Cheesecake Bars fresh, follow these simple storage instructions:
- Store covered in the refrigerator for up to 5 days for optimal freshness.
- They do not need reheating; simply slice and serve from the fridge.
- For make-ahead options, feel free to prepare these bars up to 2 days before serving.
- Although best enjoyed fresh, you can freeze these bars for up to 2 months. Ensure they are tightly wrapped in foil or plastic wrap for best results. Thaw overnight in the refrigerator before serving.
General Information
No Bake Oreo Cheesecake Bars are not just a delectable dessert; they carry a lovely connection to my childhood. I vividly remember the first time I made them with my grandmother during summer vacations. It was a simple recipe filled with laughter, stories, and a treat that was always a hit at family gatherings.
Originating from the classic cheesecake, the no-bake variant has become widespread for its ease and simplicity, making it accessible to home bakers of all skill levels. These bars are a perfect showcase of how dessert can conjure memories and celebrations, creating a bond that extends through generations.
Frequently Asked Questions
FAQ 1: Can I use low-fat cream cheese for a lighter version?
Yes! Low-fat cream cheese can be used without compromising much on flavor or texture.
FAQ 2: How long will these bars last in the refrigerator?
They will keep well in the fridge for up to 5 days, stored in an airtight container.
FAQ 3: What can I do if my filling feels too runny?
If your filling seems too soft, you can add more powdered sugar to thicken it or fold in a bit more whipped topping to stabilize it.
FAQ 4: Can these bars be made nut-free?
Absolutely! The ingredient list is already nut-free, but ensure that any substitutions or additions you make are also nut-free.
FAQ 5: What if I want to make a larger batch?
You can double the recipe and use a larger baking dish; just adjust the chilling time as needed.
Conclusion
In summary, these No Bake Oreo Cheesecake Bars are more than just a recipe—they’re a gateway to warmth, nostalgia, and shared moments with loved ones. Their creamy, rich flavor combined with the simplicity of preparation makes them a versatile option for any occasion.
If you’re looking for more inspiration in the kitchen, be sure to check out my Easy Lemon Bars and Chocolate Peanut Butter Pie—they’re effortless crowd-pleasers as well!
Thank you for journeying with me into this wonderfully sweet world of desserts today!
Interactive Elements
I invite you to share your thoughts in the comments below! Did you enjoy making these bars? Did you experiment with flavors or substitutions?
If you try this recipe, please share a photo on Pinterest
Tag me on Instagram with your delicious creations, and let’s connect through our love of food!
Nutritional Information
Here’s a quick overview of the nutritional values per serving (based on 16 servings):
- Calories: 220
- Protein: 2g
- Carbohydrates: 25g
- Fat: 12g
- Fiber: 1g
- Sodium: 120mg

Emily brings four years of dedicated baking experience and professional pastry-focused training to Moms Meals Daily. She oversees recipe validation and quality control to ensure every dessert performs consistently and reliably.
No Bake Oreo Cheesecake Bars (Creamy & Easy Dessert)
By Emily Hart
Ingredients
Instructions
Tools Needed
Save this recipe for later ❤️
Follow @mommealsdaily on Pinterest for easy dinners, desserts, and weekly inspiration.
Victoria Recipe | Easy Desserts & Dessert Recipes
Easy & Delicious Recipes
Follow for quick family-friendly recipes, baking inspiration, and comfort food favorites.
Follow on Pinterest