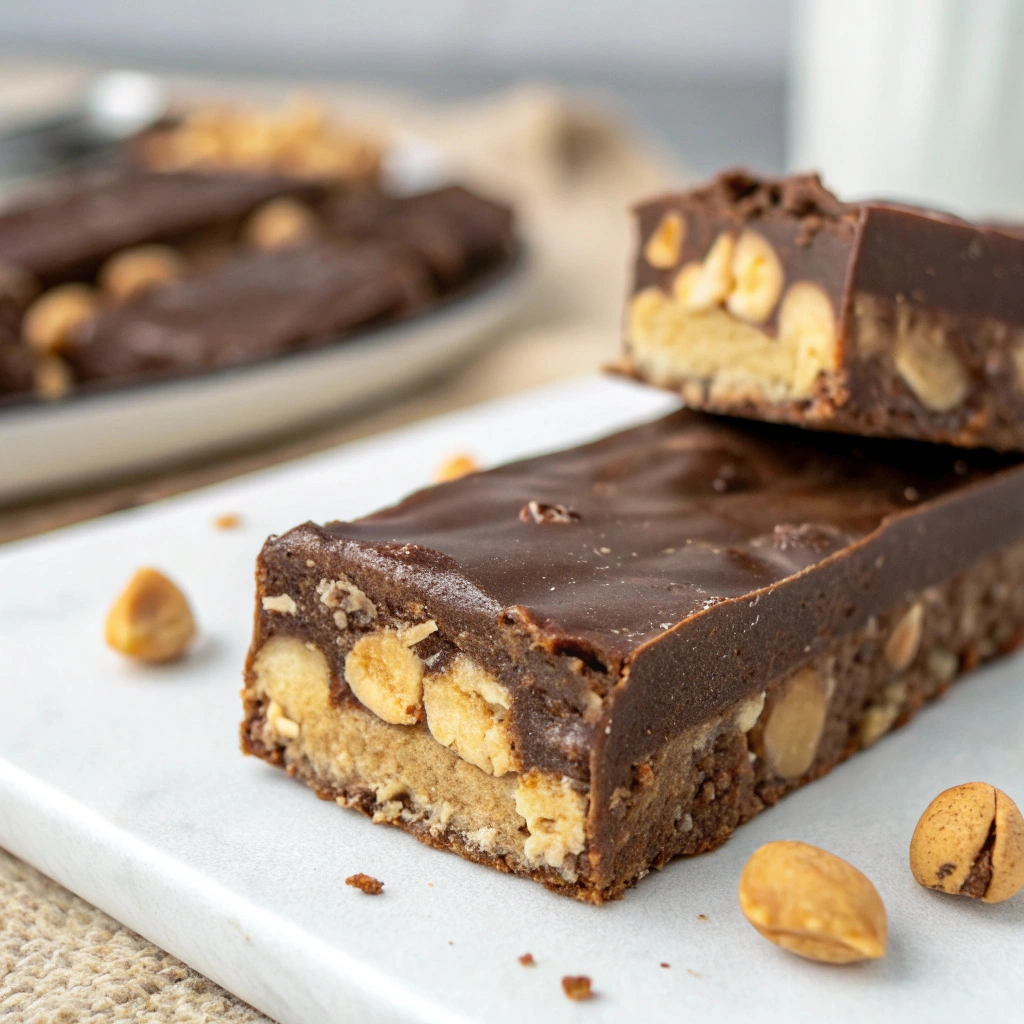
There’s something magical about the combination of chocolate and peanut butter. It reminds me of my childhood, standing in the kitchen with my mother, mixing ingredients that seemed so simple yet created something so rich and delightful. As we’d wait for these gooey treats to set, the sweet aroma would fill the air, wrapping around us like a comforting hug. I’m so excited to share this easy and delicious recipe for Peanut Butter No Bake Chocolate Bars—a 5-ingredient wonder that’s perfect for anyone craving chocolatey goodness without the fuss of baking.
Table of Contents
This recipe comes from my deep appreciation for no-bake treats, which don’t only save time but also capture the essence of homemade comfort. With the crispy texture of a graham cracker crust, the creamy richness of peanut butter, and a decadent layer of melted chocolate, each bite is pure delight. You’ll love how simple it is to whip up and how adaptable the recipe can be to suit your tastes! So grab your mixing bowl and spoons, and let’s dive into this easy dessert that’s sure to become a staple in your home. If you love cozy recipes like this, subscribe to my email list!
Overview of Recipe Content
This Peanut Butter No Bake Chocolate Bars recipe perfectly encapsulates the essence of simple desserts. They are great as a quick snack, a satisfying after-school treat, or a delicious addition to bake sales and gatherings. When it comes to flavor, expect a heavenly blend of creamy peanut butter and rich chocolate, creating a delightful experience that melts in your mouth.
You’ll adore this recipe for its convenience, requiring only five ingredients and minimal time. It’s a satisfying treat that feels indulgent but is also customizable to fit your taste. Plus, they make for perfect mini desserts for a crowd, ensuring everyone gets a taste of something sweet without a whole lot of hassle.
Ingredients

For this irresistible Peanut Butter No Bake Chocolate Bars recipe, you will need:
- 1 cup creamy peanut butter
- 1/2 cup honey or maple syrup
- 2 cups graham cracker crumbs
- 1 cup chocolate chips (semi-sweet or dark)
- 1/4 cup coconut oil
Tools Needed
To create these delightful bars, gather these essential kitchen tools:
- Mixing bowl
- Rubber spatula or wooden spoon
- 9×9-inch baking pan
- Parchment paper (for easy removal)
- Microwave-safe bowl (for melting chocolate)
- Measuring cups
Suggested Substitutions and Additions
This Peanut Butter No Bake Chocolate Bars recipe is wonderfully flexible. Here are some substitutions and additions you might consider:
- If you need a dietary swap, almond butter or cashew butter can replace peanut butter.
- If you’re looking for a vegan option, use maple syrup instead of honey.
- For a nut-free version, sunflower seed butter works perfectly—just think of the vibrant flavors it’ll add!
- Add a pinch of sea salt on top for an extra flavor kick.
- Mix in some mini marshmallows or dried fruit for added texture and sweetness.
- For a crunchier texture, consider adding chopped nuts of your choice.
How to Make
Step 1: Prepare the Base
Start by preparing your baking pan. Line a 9×9-inch baking dish with parchment paper, ensuring that it overhangs slightly on the sides for easy removal later. The smell of the parchment and the promise of a sweet treat fills your kitchen with anticipation.
In a mixing bowl, combine the creamy peanut butter and honey (or maple syrup). Stir until you achieve a smooth, creamy blend. This harmonious combination is the heart of your bars and will create a luscious base that holds all the flavors together.
Step 2: Fold in the Graham Cracker Crumbs
Next, gradually add the graham cracker crumbs to the peanut butter mixture. As you mix, the texture transforms from creamy to crumbly yet cohesive. The golden flecks of graham cracker resemble tiny nuggets that will form the base of your bars.
Stir until fully combined; this is where your muscles come into play! The mixture should become thick and cling together, almost resembling cookie dough. Don’t be shy—get in there with your spatula and make sure everything is evenly mixed.
Step 3: Press the Mixture into the Pan
Take that sturdy and delicious mixture and press it firmly into your prepared baking pan. Use a spatula or even your hands to ensure it’s evenly spread across the base. Feel free to channel your inner chef as you mold this mixture into place, creating a solid foundation for your chocolate layer.
Step 4: Melt the Chocolate Topping
Now it’s time to melt your chocolate chips and coconut oil together. In a microwave-safe bowl, combine both and heat for 30 seconds at a time, stirring in between. The aroma of melting chocolate will whisk you away—it’s pure bliss!
When melted, the mixture should be smooth and glossy, perfect for pouring over your crust. This layer will add a luxurious finish and keep everything together, further enhancing the texture.
Step 5: Pour and Spread the Chocolate Melt
Carefully pour the melted chocolate over the graham cracker base. With a spatula, spread the chocolate evenly over the top, covering it completely and creating a shiny, inviting finish.
Once you’re satisfied with the coverage, pop the entire pan into the fridge for about 1-2 hours until it’s firm. The anticipation might feel overwhelming, but trust me—it will all be worth it!
Step 6: Cut Into Bars
Once chilled and firm, remove the bars from the pan using the parchment paper overhang. Place them on a cutting board, and with a sharp knife, cut them into squares or rectangles. The moment you cut through that rich chocolate and smooth peanut butter will thrill you!
What to Serve with Peanut Butter No Bake Chocolate Bars
These bars are wonderful served on their own, but here are some ideas to elevate your experience:
- Pair with a tall glass of milk—classic and comforting!
- Serve alongside a scoop of ice cream for epic indulgence.
- Add fresh fruit, like banana slices or strawberries, to balance the richness.
- Consider garnishing with shredded coconut, crushed nuts, or drizzles of additional melted chocolate for extra flair.
And if you’re looking for more sweet treats to complement this one, I highly recommend trying my No Bake Cheesecake Bites or Chocolate Coconut Energy Balls!
Tips for Making It Perfect
- Press the crust mixture firmly into the pan for a sturdier bar that won’t crumble when cut.
- Want to whip these up in advance? Prepare them up to two days ahead and keep them covered in the fridge.
- If chocolate gets a little too thick, add a teaspoon of coconut oil or milk to achieve a smoother consistency.
- Make a double batch if you’re entertaining a crowd, as these treats disappear quickly!
- Experiment with adding your favorite flavor extracts, like vanilla or almond, for a twist.
Storage Instructions
To keep your Peanut Butter No Bake Chocolate Bars fresh:
- Store them in an airtight container in the refrigerator, where they’ll stay good for up to a week.
- If you want to enjoy them later, you can freeze the bars for up to three months. Just wrap them tightly in plastic wrap and then place them in a freezer-safe container.
- For best results, defrost in the fridge, allowing them to come back to their desirable texture.
General Information
Though nowadays, no-bake desserts are widely embraced, their origins are often traced back to earlier times when baking methods were less accessible. Many cultures have their own versions of no-bake sweets, often showcasing local ingredients. In the United States, the popularity of no-bake treats surged in the mid-20th century, heralding a time when convenience met indulgence.
I cherish fond memories of making these bars with my children, who love the hands-on experience. Teaching them the joy of creating something delicious, while also sharing stories from my own childhood, makes each batch feel even more special.
Frequently Asked Questions
- Can I swap the graham cracker crumbs?
Yes! You can use crushed digestive biscuits or even oat flour for a gluten-free version.
- How long can I store these bars?
They’ll last about a week in the refrigerator or up to three months in the freezer if well-wrapped.
- What if my mixture is too crumbly?
Simply add a bit more peanut butter or honey until the desired consistency is achieved.
- Can I make these bars dairy-free?
Absolutely! Use dairy-free chocolate chips and keep an eye on the coconut oil to ensure it’s non-dairy.
- What if I want a firmer texture?
You could refrigerate them for a bit longer or consider adding a tablespoon of coconut flour to the base mixture.
Conclusion
This Peanut Butter No Bake Chocolate Bars recipe is not just a delightful treat; it captures the warmth of home and the joy of sharing good food with loved ones. With an uncomplicated process and only five ingredients, it’s an easy and versatile dessert that will surely impress with its rich flavors and textures.
For more delightful recipes, try my No Bake Oreo Balls and Easy Chocolate Fudge Cake! Thank you for joining me on this culinary adventure, and I hope these bars become a sweet tradition in your home.
Interactive Elements
I’d love to hear from you! Leave a comment below to share your experiences with this recipe, or let me know your creative twists.
Are you on Pinterest?
Don’t forget to tag me on Instagram when you make this treat, so I can see your beautiful take on my recipe!
Nutritional Information
Here’s a simple breakdown of the approximate nutritional values per serving (based on 16 servings):
Calories: 180
Protein: 3g
Carbohydrates: 17g
Fat: 12g
Fiber: 2g
Sodium: 80mg
Enjoy your delightful no-bake adventure!

Emily brings four years of dedicated baking experience and professional pastry-focused training to Moms Meals Daily. She oversees recipe validation and quality control to ensure every dessert performs consistently and reliably.
Victoria Recipe | Easy Desserts & Dessert Recipes
Easy & Delicious Recipes
Follow for quick family-friendly recipes, baking inspiration, and comfort food favorites.
Follow on Pinterest