I’m Victoria—mom, home cook, and the heart behind Moms Meals Daily. 💛 I was born and raised in a cozy, food-loving family where meals weren’t just about eating—they were about connection, comfort, and creating memories. From a young age, I found joy in the kitchen, helping my mom whip up simple, nourishing meals that brought everyone to the table. While my life has taken many twists and turns, one thing has always remained constant: my love for food and family. That love grew even stronger when I became a mom myself. Between juggling little ones, busy days, and the never-ending “What’s for dinner?” question, I realized I needed meals that were easy, nourishing, and real—and I knew other moms did too. That’s how Moms Meals Daily was born: out of a passion for sharing doable, everyday recipes that bring joy without the stress. I’m married to my best friend and biggest supporter, who’s cheered me on every step of this journey (and is also my favorite taste-tester!). Together, we’re raising our family with love, laughter, and plenty of good food. Welcome to my kitchen! 🍽️✨
Table of Contents
Overview of Recipe Content
These aren’t just sugary blocks; they are a truly comforting, buttery, and classic holiday treat. We use a little extra butter and a splash of vanilla to deepen the flavor, making them taste so much richer than the versions you grab at the store.
What These Holiday Rice Krispie Treats Are: They are a chewy, crunchy confection made from toasted rice cereal bound together by a luscious, slightly browned butter and marshmallow mix, studded with sprinkles and maybe a few chocolate chips for good measure.
When to Serve Them:
- Christmas Cookie Swap (they travel beautifully!)
- School parties and classroom events (no-nut friendly!)
- A fun activity for the kids on a cold afternoon.
- An easy dessert for Christmas Eve dinner.
Why You Will Love Them:
- Speed is Magic: You finish them from start to finish in less than 20 minutes (not including cooling time).
- No Oven Required: Keep your oven free for that ham or those complex sugar cookies.
- Kid-Friendly: My kids can practically make these on their own now, which is a glorious gift during the holidays!
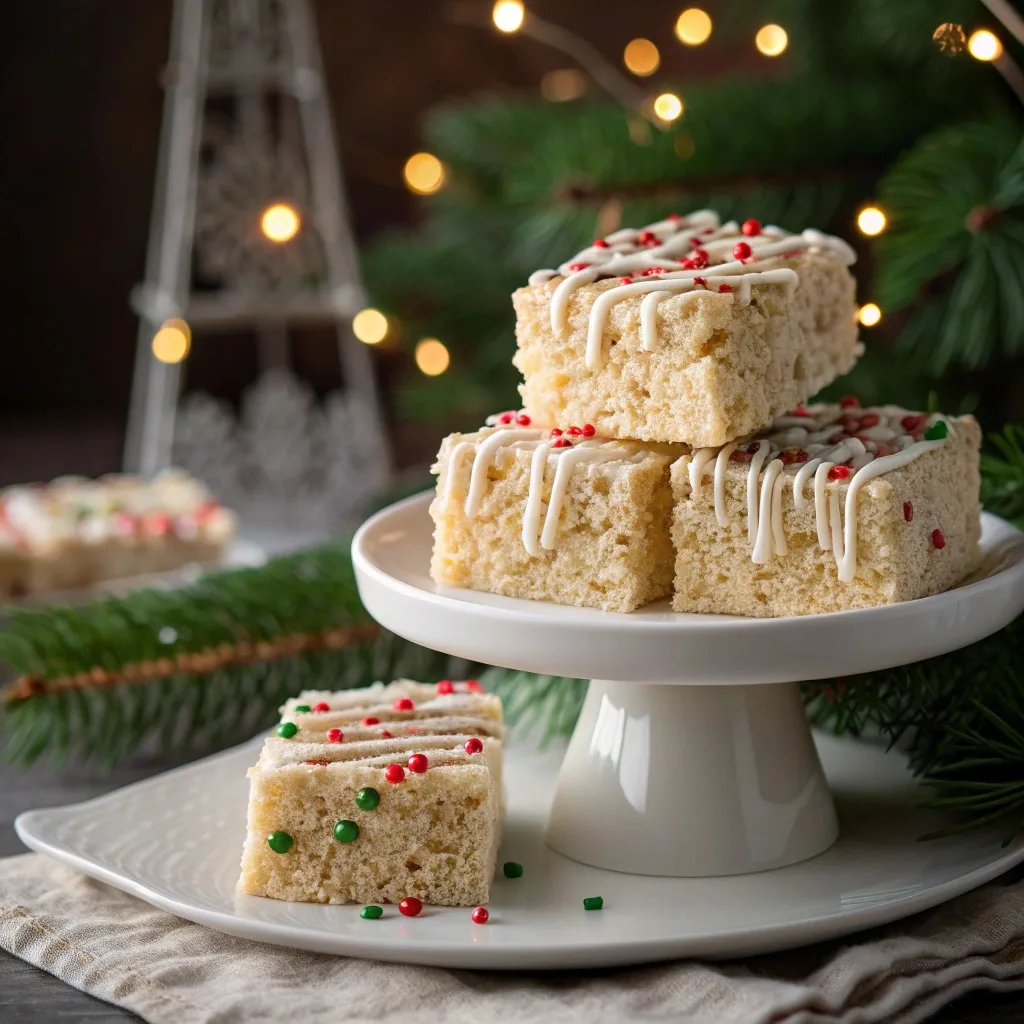
What They Taste Like: They have a wonderfully deep, toasted, buttery flavor that the vanilla extract brightens up. They are sticky and chewy, giving your jaw a little workout, and that crunch from the cereal is just so satisfying. The festive sprinkles add a tiny bit of crunch and a powerful visual punch.
Seasonal Benefits: These treats are wonderfully sturdy, making them perfect for gifting. Wrap a few squares in cellophane bags, tie them with a velvet ribbon, and you have a truly thoughtful, homemade gift ready to go. They bring a huge dose of cheer with zero holiday baking stress!
Ingredients
- 1 stick (8 tablespoons) unsalted butter (The good stuff! It makes a difference.)
- 1 (10-ounce) bag mini marshmallows (New bags melt better than old, dry ones!)
- 1 teaspoon pure vanilla extract
- 6 cups crisp rice cereal (The classic brand works beautifully.)
- 1/2 cup festive sprinkles (Make sure they are the red, white, and green holiday mix!)
- Optional: 1/4 teaspoon sea salt (A little salt balances the sweetness.)
- Optional: 1/2 cup white chocolate chips for drizzling.
Tools Needed
- Large, heavy-bottomed pot or Dutch oven (for even heating).
- 9×13-inch baking pan.
- Parchment paper (A true savior for easy removal!).
- Rubber spatula (Butter this well!).
Substitutions and Additions
- Browned Butter: For a deeper, almost caramel-like flavor, keep melting the butter until brown specs appear and the butter smells nutty. My nonna always said, “A little brown butter is a lot of love.”
- Extracts: Swap the vanilla for 1/2 teaspoon of peppermint extract for a minty holiday twist.
- Cereal: You can swap out 1-2 cups of the rice cereal for crushed pretzels or crushed gingerbread snaps for an incredible texture and holiday spice.
- Chocolate Layer: Press the mixture into the pan, then immediately pour a melted layer of white or dark chocolate over the top and let it set before cutting.
How to Make Holiday Rice Krispie Treats
Making these is less a recipe and more a quick, enjoyable ritual. You move fast, the smells are incredible, and the payoff is immediate! Remember to use an active voice here—we are making this magic happen.
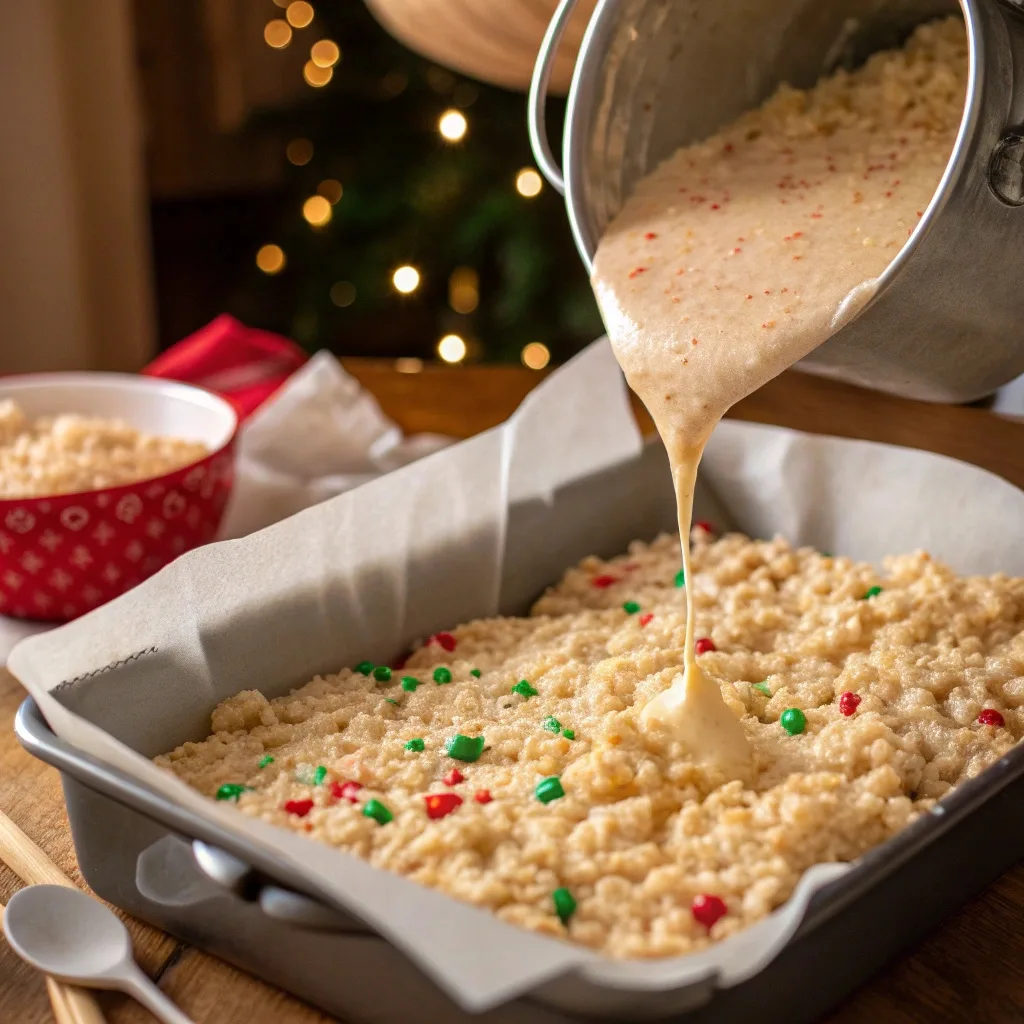
1. Prep Your Pan (The Secret Step): First, grab your 9×13-inch baking pan. Line it completely with parchment paper, leaving an overhang on the sides. This is the single most important step for easy cleanup and perfectly cut squares. Trust me, I’m kicking myself for not figuring this out sooner! Once lined, lightly spray the parchment with a tiny bit of cooking spray.
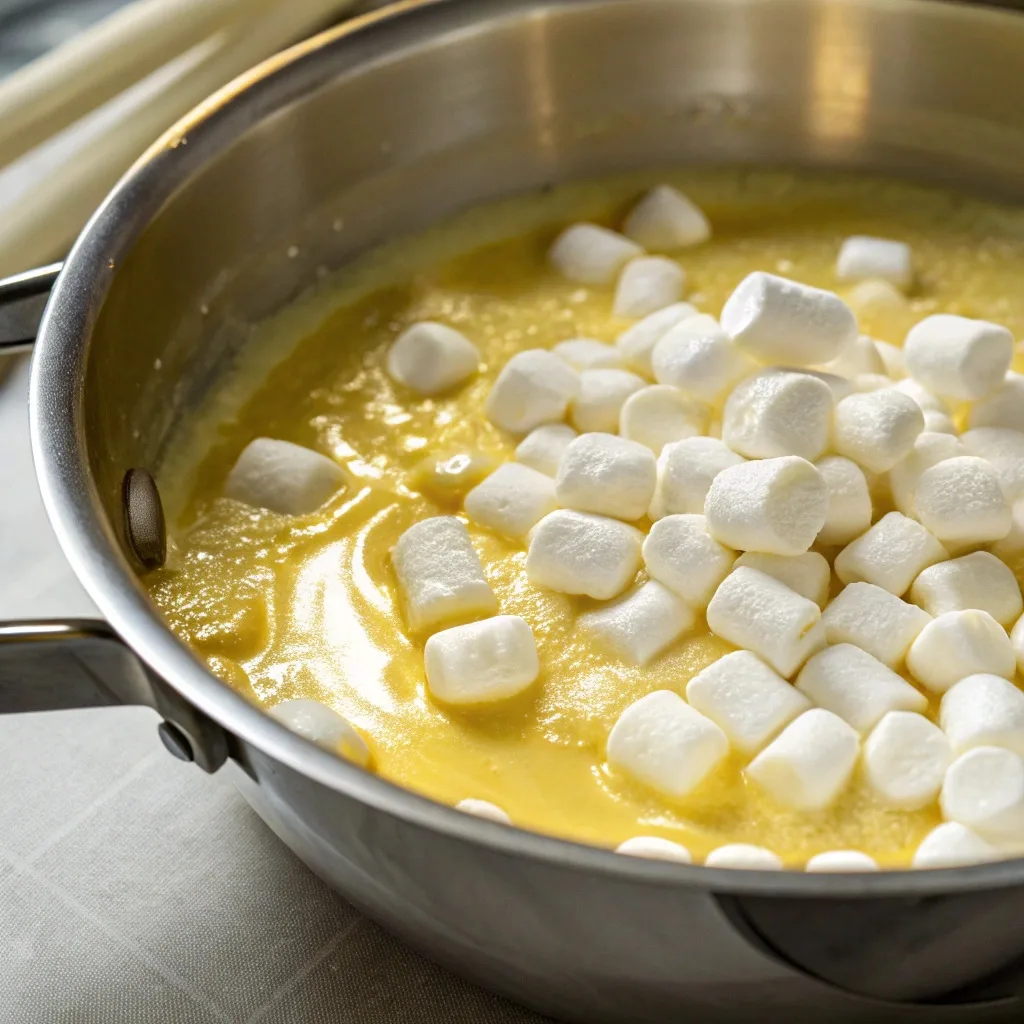
2. Melt the Butter (Smell the Magic): Set your large pot over medium-low heat. Add the full stick of butter. Let the butter melt slowly, stirring occasionally. You will hear it sizzle and bubble. When it has fully melted and starts to smell rich and toasted, it is ready. This is where the magic starts—the smell of melting butter fills the whole kitchen with instant comfort.
3. Marshmallow Meltdown: Pour the entire bag of mini marshmallows into the melted butter. Reduce the heat to low. Stir constantly until the marshmallows are about 90% melted. They should look glossy and smooth with just a few small lumps remaining. Once you see the mixture getting sticky and pulling, immediately take the pot off the heat. Do not boil the mixture! Boiling makes the sugar harden later, leading to rock-hard treats.
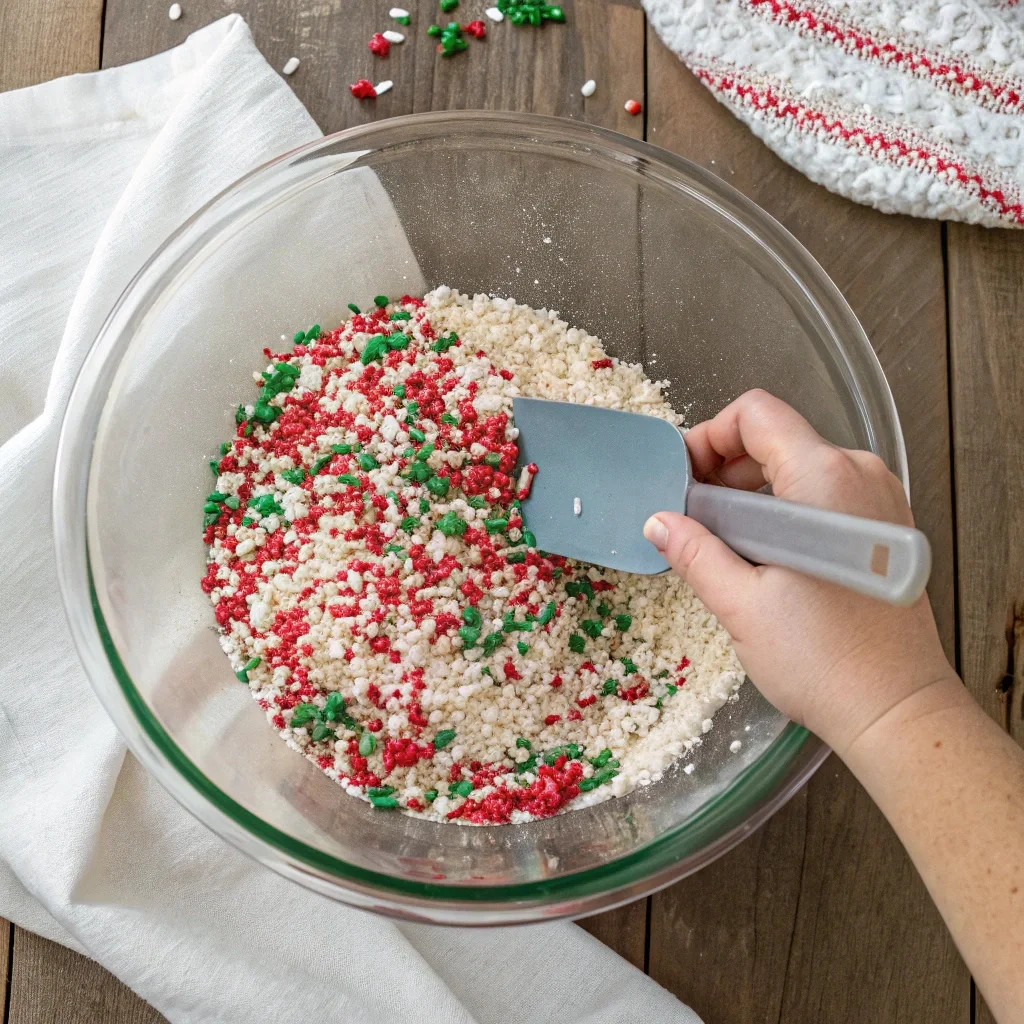
4. Flavor and Fold: Off the heat, stir in the vanilla extract and the optional sea salt. Now, working quickly, pour the 6 cups of crisp rice cereal into the marshmallow mixture. Use your buttered rubber spatula to gently fold the cereal into the marshmallow. Be decisive, but gentle. You want the cereal coated, not crushed. As the mixture begins to cool slightly, stir in the festive sprinkles—save a few tablespoons for the top!
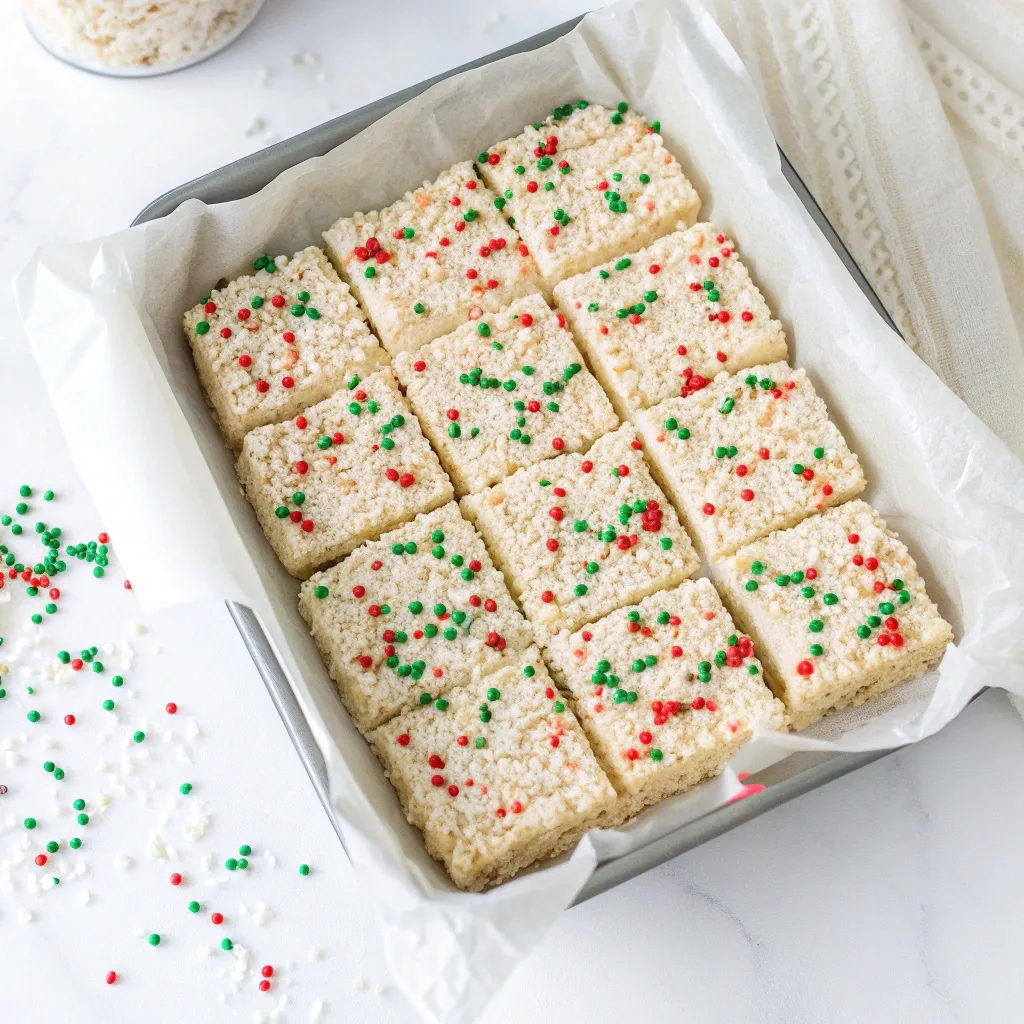
5. Press and Decorate: Scrape the entire gooey mixture into your prepared 9×13-inch pan. Here’s another vital tip: lightly press the mixture into the pan. Do not cement it down. If you press too firmly, you crush the cereal and your treats become dense and chewy. A light, even pat is all you need. Sprinkle the remaining festive sprinkles over the top while the mixture is still warm and tacky.
6. Cool and Cut (The Patience Test): Let the treats cool completely on the counter for at least two hours. If you are in a frantic rush, you can place them in the refrigerator for about 30 minutes, but no longer—the cold air makes them brittle! Once cool, use the parchment paper overhang to lift the entire block out of the pan. Place it on a cutting board and cut it into 24 even squares.
What to Serve with Holiday Rice Krispie Treats
These treats are sweet, so the perfect pairing is something warm, rich, or slightly tart to cut the sweetness.
- Warm Drinks: Pair them with a steaming mug of rich hot chocolate or a cozy cup of peppermint tea. The creaminess of the cocoa is an absolute dream with the marshmallow chew.
- Other Festive Flavors: The crunch of the treats is a wonderful contrast to the soft, cakey texture of a classic ginger cookie or a piece of peppermint bark.
- The Adult Pairing: For a cozy evening by the fire, serve them alongside a glass of spiced cider or a creamy homemade eggnog. My husband likes to pair them with a robust, dark-roast coffee.
- Full Meal: If these treats are dessert, consider balancing the plate with a savory favorite like my One-Pan Holiday Brunch Casserole (though that’s usually breakfast, it works for dinner too!) or something fast and comforting like my 30-Minute Cheesy Pasta. You can find the recipes here:
Tips for Making It Perfect
Achieving that perfect, soft, and chewy treat is easy, but it requires avoiding a few common pitfalls.
Prep Tips:
- Measure Everything First: This is a fast-moving recipe. Once the marshmallows start melting, you don’t have time to measure the cereal. Have your bowl of cereal and all your tools ready to go.
- Use Fresh Marshmallows: Old, stale marshmallows lose their moisture and elasticity. They will not melt into that beautiful, glossy binder you need. A fresh bag is worth the trip to the store!
Make-Ahead Advice:
- You can make these up to 3 days in advance. Store them at room temperature in an airtight container.
- They are great for shipping! Since they are sturdy and don’t require refrigeration, you can pack them up in a tin to send to family across the country.
Common Pitfalls to Avoid:
- High Heat is Your Enemy: Never melt the butter and marshmallows over medium or high heat. This overheats the sugars, making the final treats hard and brittle. Stick to a low-and-slow melt!
- Don’t Over-Mix: Once the cereal is in, fold just until combined. Over-mixing can break up the cereal and make the treats too sticky and dense.
- Never Refrigerate (For Long): While a quick chill to set is fine, storing them in the fridge will dry them out and make them hard. Room temperature is the key to that chewy perfection.
Storage Instructions
Proper storage is what keeps your Holiday Rice Krispie Treats delightfully soft for days!
- Storing Leftovers: Store the uncut or cut squares in an airtight container at room temperature for up to 3 days. I like to place a piece of parchment paper between layers if I stack them.
- Freezing: I do not recommend freezing this particular recipe. The cereal tends to get soggy upon thawing, and the texture is never quite right. Since they are so fast to make, it’s better to just whip up a fresh batch!
- Reheating: No need! Serve these straight from the counter. If you find them a little too firm after a few days, you can microwave a square for about 5-10 seconds to restore that original, melt-in-your-mouth stickiness.
General Information
The Rice Krispie Treat is an all-American classic with a surprisingly old history! The original recipe was created in 1939 by a Kellogg’s employee named Mildred Day at the company’s home economics department. It was originally called “Marshmallow Squares” and was promoted as a fun, no-bake project for kids.
The holiday season is the perfect time to bring this simple dessert back into the rotation. Why? Because the heart of the holidays is about simple, shared joys. My nonna always made a point of having one dessert that was “just for the kids,” and this one fits the bill perfectly. When they help you stir in the red and green sprinkles, their faces light up with such pure joy—it’s a memory you create every year. It’s also a terrific example of how to use simple ingredients to make something truly special.
We always serve these on a tiered platter with my famous Easiest Sugar Cookies. It creates a beautiful, colorful centerpiece for our dessert table.
👉 The Easiest Sugar Cookies You Will Ever Make
Frequently Asked Questions
Why are my Holiday Rice Krispie Treats hard and brittle?
Can I use butter instead of margarine?
Can I make these in the microwave?
How do I get the sprinkles to stick perfectly?
Are these naturally gluten-free?
What is the best way to cut them cleanly?
Conclusion
These Holiday Rice Krispie Treats are truly a holiday hero. They give you all the cheer and deliciousness of a homemade dessert without ever needing to turn on your oven. They are a simple, yet powerful way to bring that homemade comfort to every party and gathering this season. Making them is a joyful reminder that the best holiday memories are often the easiest and the fastest to create!
If you are looking for other fast, festive recipes, try my incredibly decadent Peppermint Mocha Recipe or, for a sturdier sweet, a quick batch of Slow Cooker Pulled Pork (because even holiday moms need a savory dinner break!):
Tell me, what’s your favorite color of marshmallow? Are you a pink or green holiday treat maker? Let me know in the comments below!
And if you make these spectacular squares, please tag me on social media or save this recipe to your holiday board! You can always find me sharing the best family meals here:

Emily brings four years of dedicated baking experience and professional pastry-focused training to Moms Meals Daily. She oversees recipe validation and quality control to ensure every dessert performs consistently and reliably.
Victoria Recipe | Easy Desserts & Dessert Recipes
Easy & Delicious Recipes
Follow for quick family-friendly recipes, baking inspiration, and comfort food favorites.
Follow on Pinterest