There’s something magical about the simplicity of no-bake desserts, especially when they come together to create a treat that feels indulgently delicious yet effortlessly charming. I’m so excited to share this Maple Sweetened No Bake Cookie Dough Bars recipe with you today! Inspired by childhood cravings for cookie dough that (let’s be honest) often go unquenched because of the raw egg concern, these bars have quickly become a staple in my kitchen. They are rich in flavor, smooth in texture, and oh-so-satisfying, with a hint of maple sweetness that adds a warm, cozy glow to every bite.
As I prepared this recipe, the warm scent of maple syrup filled my kitchen, wrapping me in a comfort that brought back memories of family gatherings around the kitchen table, eager to sample the latest sweet creation. I knew right then—this is not just any dessert; it’s a nostalgic invitation to share and indulge.
So if you love cozy recipes like this, subscribe to my email list!
Table of Contents
Overview of Recipe Content
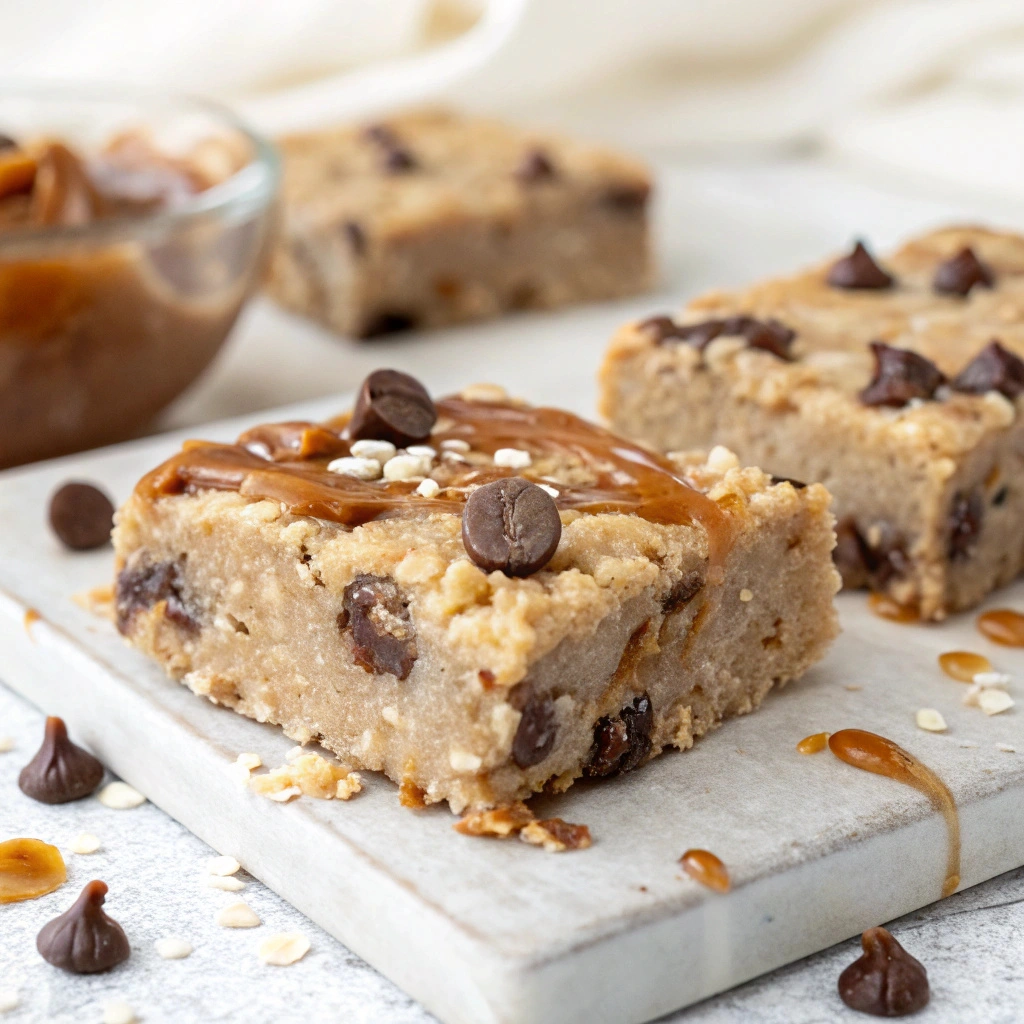
Maple Sweetened No Bake Cookie Dough Bars are the perfect combination of creamy, sweet, and utterly satisfying—without ever having to turn on the oven!
These bars shine not just in taste but also in their versatility. They’re ideal for snack time, dessert after dinner, or when you’re craving something sweet but don’t have the time or energy for a baking marathon.
Each bite is nutty and buttery, lightly sweetened with maple syrup, creating a harmonious balance of flavors and textures that will leave you wanting more. Plus, they’re super quick to whip up, making them a go-to choice when you’re in need of a simple dessert with few ingredients. Did I mention they are also perfect for gatherings? You can easily make these bars in large batches and serve them as mini desserts for a crowd. What’s not to love?
Ingredients

- 1 cup almond flour
- 1 cup rolled oats
- 1/2 cup maple syrup
- 1/4 cup natural peanut butter or almond butter
- 1 teaspoon vanilla extract
- Pinch of salt
- 1/2 cup mini chocolate chips (optional)
- Toppings (optional): chopped nuts, shredded coconut, or additional chocolate chips
Tools Needed
- Mixing bowl
- Silicone spatula
- 8×8 inch baking pan
- Parchment paper
- Measuring cups and spoons
Suggested Substitutions and Additions
- For a gluten-free version, ensure your oats are certified gluten-free.
- If you need a nut-free option, substitute almond flour with sunflower seed flour and skip the nut butter, perhaps using tahini instead.
- Instead of maple syrup, agave nectar or honey can also be excellent for sweetness.
- Add protein powder for an energy boost or swap in your favorite nut butter for different flavor profiles.
- Feeling adventurous? Mix in dried fruit, seeds, or even spices like cinnamon for that extra pizzazz!
How to Make
Step 1: Prepare the Mixing Bowl
In a mixing bowl, combine the almond flour, rolled oats, and a pinch of salt. The nutty aroma of almond flour blends beautifully with the wholesome scent of oats as you toss them together. This forms a solid base that holds it all together!
Step 2: Add the Sweetness
Next, pour in the maple syrup and add your natural peanut butter. The golden syrup flows, intertwining with the thick, creamy butter. This step is crucial because it not only adds flavor but also binds all other components in perfect harmony. Stir until fully combined, and let the sweetness envelop every particle.
Step 3: Incorporate the Flavor
Add the vanilla extract to the mix. This fragrant essence heightens the overall tasting experience and adds warmth. Stir slowly; you’ll notice the mixture coming together, forming a slightly sticky dough.
Step 4: Add Chocolate Chips (Optional)
Gently fold in the mini chocolate chips, if desired. The little morsels introduce that classic cookie dough feel—melty and comforting. It’s this step that brings about the anticipation of that first bite!
Step 5: Prepare the Baking Pan
Line your 8×8 inch baking pan with parchment paper. This makes for an easy removal of your bars later on. Transfer the cookie dough mixture into the prepared pan, pressing it down firmly with your spatula. The texture will be slightly crumbly, but don’t worry; as they chill, they will come together beautifully.
Step 6: Chill and Set
Place the pan into the refrigerator for at least 1-2 hours. The excitement during the wait builds! As it cools, the flavors meld, the texture firms, and you can almost taste it already.
Step 7: Slice and Serve
Once set, remove the bars from the pan using the parchment paper. Slice into squares or rectangles, giving you the option of mini desserts that feel indulgent yet perfectly portioned!
What to Serve with Maple Sweetened No Bake Cookie Dough Bars
These cookie dough bars are deliciously versatile and pair wonderfully with:
- A cold glass of almond milk or coconut milk for a refreshing twist.
- Fresh fruits like strawberries or banana slices for a pop of color and flavor on the side.
- A dollop of Greek yogurt for a creamy, tangy contrast that balances the sweetness of the bars.
Feeling adventurous? Try serving them alongside my Vanilla Chia Seed Pudding or a classic Berry Parfait to create a delightful dessert spread!
Tips for Making It Perfect
- If you want to prep these ahead of time, they’re perfect for meal prepping. Make a batch over the weekend, and they can last you throughout the week as quick snacks.
- Keep an eye on the amount of nut butter; it can be the difference between a gooey mess and the perfect density. If it feels too wet, a touch more almond flour will help.
- To customize the bars for flavor, consider using flavored nut butters such as chocolate or vanilla.
- Don’t hesitate to pack in extra ingredients like dried cranberries or additional nuts; just remember to keep the ratios balanced.
Storage Instructions
Make-ahead options work beautifully with these bars!
- Store leftovers in an airtight container in the refrigerator for up to a week.
- For longer storage, freeze them for up to 2 months. Simply wrap them in plastic wrap and place them in a freezer-safe container.
- To serve frozen bars, allow them to defrost in the fridge overnight or for about 15-20 minutes at room temperature before enjoying.
General Information
The origin of cookie dough delights many of us, stemming from that universal love for sneaking a taste while baking. These Maple Sweetened No Bake Cookie Dough Bars represent that joy, celebrating simplicity and nourishment in each bite. In my journey of cooking and sharing, I believe these bars embody the heartwarming feeling of home, reminding me of my grandmother’s kitchen filled with love and laughter.
Frequently Asked Questions
Can I use different sweeteners, or does it have to be maple syrup?
Yes! You can use agave nectar or honey as alternatives. Just remember, each sweetener has its unique flavor profile, so choose what you prefer.
How long do these bars last in the refrigerator?
They will last about a week in the refrigerator if stored properly in an airtight container.
What can I do if the texture is crumbly and it won’t stick together?
If your mixture feels too dry, add a touch more nut butter to help bind the ingredients better!
Are these bars suitable for vegan diets?
Yes, as long as you use a plant-based and nut-free butter substitute if necessary, and opt for maple syrup instead of honey.
Conclusion
In essence, the Maple Sweetened No Bake Cookie Dough Bars embody a delightful harmony of flavor and texture, offering an effortless approach to homemade desserts. They not only meet the needs of busy individuals seeking easy desserts but also deliver joy through sweet bites. As you explore these hands-on moments in the kitchen, I hope you’ll realize that simplicity and happiness go hand-in-hand.
If you enjoyed these cookie dough bars, you may want to try my Chocolate Avocado Mousse or Vanilla Chia Seed Pudding for another simple yet delicious dessert option.
Until next time, happy cooking, and may your kitchen be filled with laughter and love!
Interactive Elements
I’d love to hear from you! Leave a comment or review below and let me know how your no-bake cookie dough bars turned out.
Don’t forget to share a photo on Pinterest:
And feel free to tag me on Instagram—I’d love to see your creations!
Nutritional Information
Approximate nutritional values per serving (based on 16 servings):
- Calories: 150
- Protein: 4g
- Carbohydrates: 19g
- Fat: 7g
- Fiber: 2g
- Sodium: 50mg

Emily brings four years of dedicated baking experience and professional pastry-focused training to Moms Meals Daily. She oversees recipe validation and quality control to ensure every dessert performs consistently and reliably.
Maple Sweetened No Bake Cookie Dough Bars
By Emily Hart
Ingredients
Instructions
Tools Needed
Save this recipe for later ❤️
Follow @mommealsdaily on Pinterest for easy dinners, desserts, and weekly inspiration.
Victoria Recipe | Easy Desserts & Dessert Recipes
Easy & Delicious Recipes
Follow for quick family-friendly recipes, baking inspiration, and comfort food favorites.
Follow on Pinterest