There’s something magical about desserts that require no baking—a relief from the hot oven and an invitation to indulge in a dish that feels effortless and refreshing. Today, I’m so excited to share my No Bake Peach Cream Icebox Cake with you! This delightful treat is inspired by the warm summer evenings spent gathering around the table with family and friends, when the air is filled with laughter, and the sweetness of ripe peaches dances in the breeze.
Table of Contents
As I reminisce about those sunny days, I can almost taste the juicy peaches paired with a velvety creamy filling—a combination that embodies the essence of summer. Each slice of this cake reveals layers of sweetness and lightness, enveloped in a symphony of flavors and textures that are nothing short of heavenly.
With minimal ingredients and no baking required, this No Bake Peach Cream Icebox Cake is not just a treat; it’s a memory waiting to happen, an easy dessert with few ingredients that anyone can whip up. So, grab your apron and get ready to freeze your way to bliss! If you love cozy recipes like this, subscribe to my email list!
Overview of Recipe Content
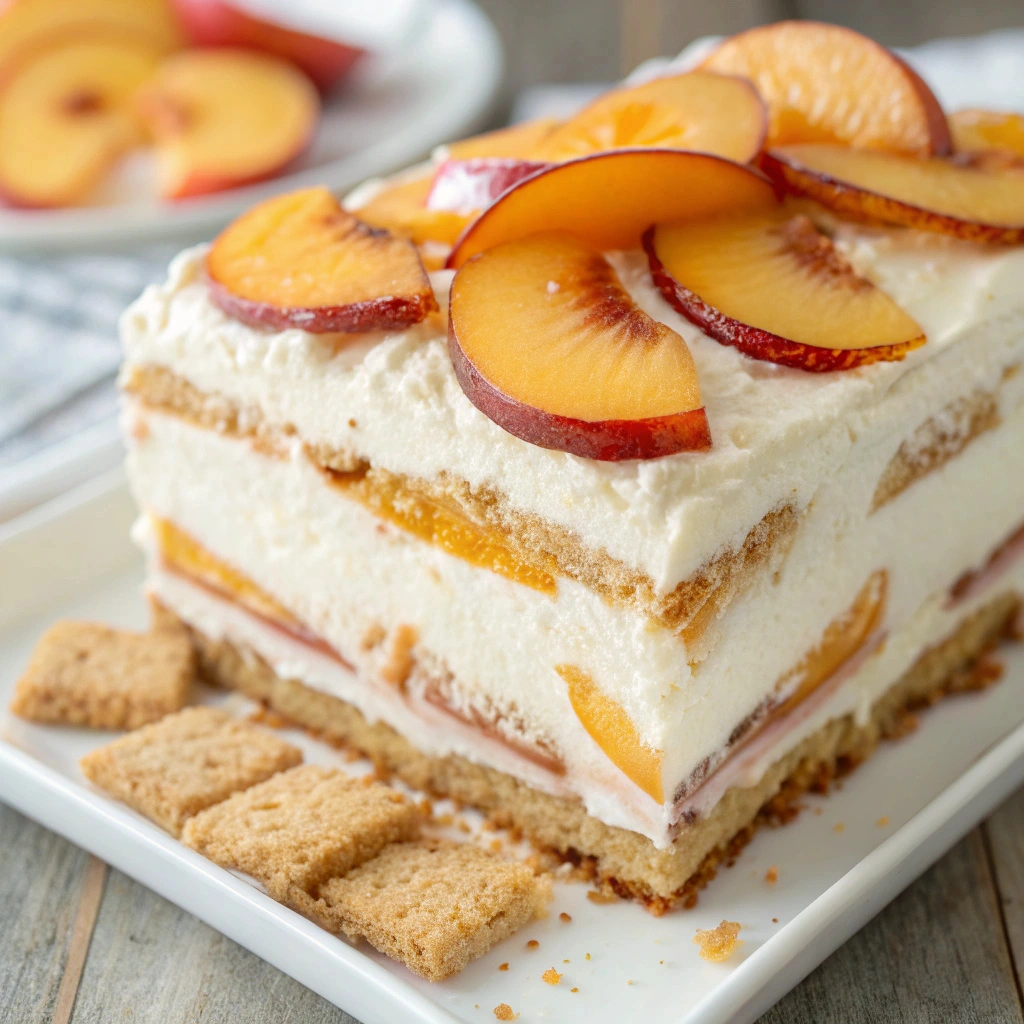
This No Bake Peach Cream Icebox Cake is a simple yet elegant dessert that highlights the juicy essence of summer peaches, making it a perfect addition to your gatherings or bake sales. Best served chilled, it’s the ideal treat for warm days when you crave something cool and refreshing.
Imagine cutting into this cake—each layer presents a delightful contrast of textures, with creamy filling hugging the sweet, tender peach slices. The graham cracker crust adds a satisfying crunch, tying everything together in a picturesque slice that dazzles the eyes.
You’ll love this recipe not only for its comfort and ease but also for its versatility. Adjust the flavors based on seasonal fruits, ensuring a fresh experience every time. Plus, with no baking required, you can prepare it in a snap, making it a fantastic option for last-minute gatherings and summer celebrations.
Ingredients

For the crust:
- 2 cups of graham cracker crumbs
- 1/2 cup of melted unsalted butter
- 2 tablespoons of granulated sugar
For the creamy filling:
- 2 cups of heavy whipping cream
- 1/2 cup of powdered sugar
- 1 teaspoon of vanilla extract
- 8 ounces of cream cheese, softened
For the peach layer:
- 4 cups of fresh peaches, peeled and sliced
- 2 tablespoons of lemon juice
- 1/4 cup of granulated sugar
Optional toppings:
- Whipped cream
- Fresh mint leaves
- Additional peach slices for garnish
Tools Needed
- Mixing bowls
- Electric mixer
- 9×13 inch baking dish
- Rubber spatula
- Measuring cups and spoons
- Paring knife
- Cutting board
Suggested Substitutions and Additions
Sometimes, you might find yourself missing a few ingredients in your pantry, but worry not! Here are some helpful substitutions and additions:
- For a healthier crust, you can swap out graham cracker crumbs for crushed nuts or oats mixed with a little coconut oil.
- If you don’t have heavy whipping cream, you can opt for coconut cream for a non-dairy alternative.
- For a unique flavor twist, add a hint of almond extract or orange zest to your cream cheese filling.
- Fresh berries can be incorporated along with or in place of peaches for a berry variation.
- If you’re looking for something more decadent, fold in some melted chocolate into the creamy filling for a delightful chocolate peach combo.
How to Make
Step 1: Prepare the Crust
Start by mixing the graham cracker crumbs, melted butter, and sugar in a mixing bowl. The smell of buttery crumbs will fill your kitchen, and your mouth may start to water! Mix them until combined, resembling wet sand. Press this mixture into the bottom of a 9×13 inch baking dish, creating an even layer that will form the foundation of your cake. This simple step is crucial as it provides a crunchy contrast to the creamy filling to come.
Step 2: Make the Peach Layer
While the crust sets, it’s time to prepare the peach layer. In a separate bowl, combine the sliced peaches with lemon juice and granulated sugar. The lemon juice helps retain the bright color of the peaches and enhances their natural sweetness. Toss gently, ensuring all the peach slices are coated. Set aside to let the peaches macerate for about 10 minutes, as they release their juices and flavors.
Step 3: Prepare the Creamy Filling
In a large mixing bowl, beat the heavy cream with an electric mixer until soft peaks form. The sound of the mixer whirring fills the air, a soothing reminder of how the textures will soon come together. Gradually add in the powdered sugar and vanilla, continuing to whip until the mixture is light and fluffy. In another bowl, beat the softened cream cheese until smooth, and gently fold in your whipped cream. This creates the luscious cream filling that truly defines the dessert.
Step 4: Assemble the Cake
Start by pouring half of the creamy filling over the prepared crust, smoothing it out evenly with a spatula. Next, layer the macerated peach slices over the cream, arranging them beautifully. Pour the remaining cream mixture over the peaches to seal them in. Finally, add any remaining peach slices on top for an extra pop of color and flavor.
Step 5: Chill and Serve
Cover the baking dish with plastic wrap and place it in the refrigerator for at least 4-6 hours, but overnight is best. This resting time allows the flavors to meld beautifully while the dessert sets. When you’re ready to serve, cut into squares, and feel free to add a dollop of whipped cream and a sprinkle of mint leaves for that finishing touch!
What to Serve with No Bake Peach Cream Icebox Cake
Pair this No Bake Peach Cream Icebox Cake with light and refreshing side dishes, like a simple green salad tossed with vinaigrette. To enhance the summer vibes, consider serving it with beverages such as iced tea, homemade lemonade, or a fruity sangria.
For garnishes, fresh mint leaves and additional peach slices can elevate your dessert presentation. You might also enjoy it alongside another summer favorite—my Watermelon Feta Salad or a tangy Lemon Sorbet for a lovely contrast of flavors.
Tips for Making It Perfect
- Prep-ahead advice: This dessert is best made the day before, allowing it to chill overnight for optimal flavor and texture.
- Fixing common mistakes: If your cream hasn’t whipped properly, ensure your mixing bowl and beaters are cold. Chill them before starting.
- Texture adjustments: For a smoother filling, ensure the cream cheese is at room temperature before mixing to eliminate lumps.
- Doubling or meal prep tips: If you’re feeding a larger crowd, simply double the recipe and use a larger baking dish.
- Experiment with flavors: Swap peaches for fresh strawberries, raspberries, or mixed summer berries based on your preferences.
Storage Instructions
For storage, keep any leftover cake tightly covered in the refrigerator. It lasts up to 4-5 days, although it is best enjoyed fresh. To reheat, simply let it sit at room temperature for about 10-15 minutes before serving.
Make ahead options are plentiful! Prepare the cake a day in advance and allow it to set overnight. Freezing is not recommended, as the texture could change upon thawing.
General Information
The No Bake Peach Cream Icebox Cake draws inspiration from classic summer desserts that often grace picnics and family gatherings. The tradition of icebox cakes dates back to the 1920s, when refrigeration became common, allowing folks to utilize simple ingredients to create sumptuous, chilled desserts.
I fondly recall the summer evenings spent with my grandmother in her kitchen, experimenting with various iterations of icebox treats to share with family. Each bite would evoke the warmth of familial bonds, further enhancing my love for storytelling through food.
Frequently Asked Questions
- Can I use frozen peaches instead of fresh?
Yes, you can use frozen peaches! Just make sure they are thawed and drained well before using them in the recipe.
- How long can I store this cake?
You can store the No Bake Peach Cream Icebox Cake in the refrigerator for up to 5 days, but it’s best served fresh.
- What should I do if my whipped cream doesn’t hold its shape?
Ensure that your whipping bowl and beaters are very cold, and don’t over-whip it. Stop when you reach soft peaks for best results.
- Can I make this cake gluten-free?
Absolutely! You can use gluten-free graham crackers or crushed nuts to create the base for a tasty alternative.
Conclusion
This No Bake Peach Cream Icebox Cake is truly special—a delightful blend of comfort, flavor, and the joy of summertime. Its simplicity and versatility allow you to switch up ingredients while retaining that beloved refreshing flavor. If you’re looking for more fun dessert ideas, try my Berry Fool or No Bake Chocolate Cheesecake for an equally delightful experience.
Thank you for joining me in this gastronomic adventure! I hope you savor every bite and create memories that are just as sweet.
Interactive Elements
I would love to hear from you! Leave a comment or review below with your thoughts on the recipe. If you make this cake, be sure to share a photo on Pinterest or tag me on Instagram so I can see your creations!
Nutritional Information
Here’s the approximate nutritional value per serving:
Calories 320
Protein 3g
Carbohydrates 38g
Fat 20g
Fiber 2g
Sodium 98mg
Enjoy your sweet adventure with this No Bake Peach Cream Icebox Cake!

Emily brings four years of dedicated baking experience and professional pastry-focused training to Moms Meals Daily. She oversees recipe validation and quality control to ensure every dessert performs consistently and reliably.
No Bake Peach Cream Icebox Cake
By Emily Hart
Ingredients
Instructions
Tools Needed
Save this recipe for later ❤️
Follow @mommealsdaily on Pinterest for easy dinners, desserts, and weekly inspiration.
Victoria Recipe | Easy Desserts & Dessert Recipes
Easy & Delicious Recipes
Follow for quick family-friendly recipes, baking inspiration, and comfort food favorites.
Follow on Pinterest