I’m Victoria—mom, home cook, and the heart behind Moms Meals Daily. 💛 I was born and raised in a cozy, food-loving family where meals weren’t just about eating—they were about connection, comfort, and creating memories. From a young age, I found joy in the kitchen, helping my mom whip up simple, nourishing meals that brought everyone to the table. While my life has taken many twists and turns, one thing has always remained constant: my love for food and family. That love grew even stronger when I became a mom myself. Between juggling little ones, busy days, and the never-ending “What’s for dinner?” question, I realized I needed meals that were easy, nourishing, and real—and I knew other moms did too. That’s how Moms Meals Daily was born: out of a passion for sharing doable, everyday recipes that bring joy without the stress. Welcome to my kitchen! 🍽️✨
Table of Contents
Overview of Recipe Content
What exactly are we making? We’re crafting the classic, creamy Oreo truffle—the one with the rich chocolate cookie base and a tang of cream cheese—and transforming it into adorable, edible Christmas ornaments. They are the perfect holiday confection to serve at a cookie exchange, package up for neighbor gifts, or simply leave out for Santa (he deserves something easy!).
Why You Will Love These Oreo Truffle Ornaments
- No Oven Required: These are a true no-bake dessert, perfect for when your oven is slammed with savory dishes or other Christmas cookies.
- Insanely Simple: The basic recipe uses only three staple ingredients. Your kids can absolutely help crush the cookies and roll the balls!
- The Taste is Divine: Every bite delivers a rush of dense, rich chocolate that melts beautifully in your mouth. The coating provides a satisfying snap before you hit the creamy, classic truffle center.
- Festive and Fun: We use white chocolate, bright red and green sprinkles, and tiny pretzel pieces to make them look like actual ornaments ready for the tree!
What They Taste Like
Imagine the velvety texture of the softest fudge, but with a deep, dark Oreo flavor. The cream cheese adds a slight, pleasant tanginess, balancing the intense sweetness of the cookies and the white chocolate coating. When you drizzle dark chocolate over the top and add crunchy sanding sugar, you get layers of textures—creamy, snappy, and crunchy—that make these truffles irresistible. The chill from the refrigeration makes them firm, dense, and utterly decadent.
Ingredients & Tools Needed
You likely have most of these ingredients in your pantry right now! Always use the full-fat cream cheese block for the best flavor and texture.
Ingredients (Yields about 30 Ornaments)
- 1 (14.3 oz) package of OREO cookies (original flavor—avoid Double Stuf!)
- 8 oz cream cheese, softened to room temperature (one block, full-fat)
- 1 pound white almond bark or melting wafers
- 1/2 pound dark chocolate almond bark or melting wafers (or chocolate chips)
- Colorful sprinkles, sanding sugar, or edible glitter for decorating
- Small pretzel sticks or pieces of pipe cleaner (for the ornament hanger look)
Tools Needed
- Food processor (makes crushing cookies lightning fast!) or a zip-top bag and a rolling pin
- Large mixing bowl
- Parchment paper or wax paper
- 2 baking sheets
- Microwave-safe bowls (or a double boiler) for melting chocolate
- A fork or a dipping tool
Substitutions and Additions
Making these Oreo Truffle Ornaments your own is part of the fun!
- Cookie Swaps: Try Golden Oreos for a vanilla-flavored truffle, or use Mint Oreos and dip them in dark chocolate for a refreshing peppermint twist. My son, Leo, insists on using Peanut Butter Oreos every year!
- Chocolate Coating: Use high-quality melting wafers, which set up the quickest and give you a beautiful, shiny finish. If you must use chocolate chips, add a teaspoon of coconut oil or shortening to your melted chocolate to make the dipping process smoother and less prone to seizing.
- Toppings: Crushed candy canes, mini chocolate chips, or a simple dusting of cocoa powder work perfectly if you skip the sprinkles. For a grown-up look, dust them with edible gold dust.
How to Make Oreo Truffle Ornaments
The process for making these Oreo Truffle Ornaments is truly forgiving, but the key is patience during the chilling steps. Active voice keeps our instructions clear and direct!
Step 1: Crush the Cookies to a Fine Crumb
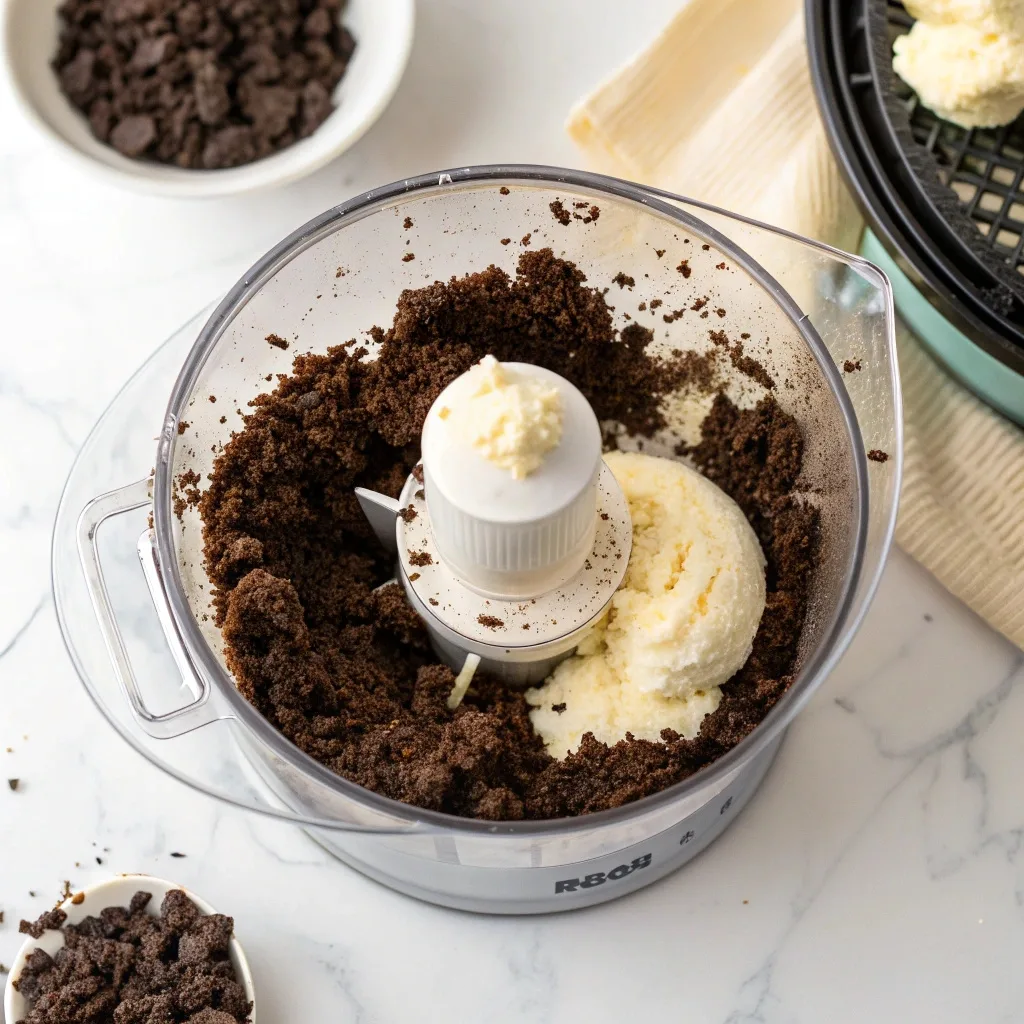
Grab your entire package of OREO cookies, cream filling and all. Toss them into your food processor and pulse until they become fine, beautiful crumbs. We want the texture of coarse sand, not flour. If you don’t have a food processor, seal the cookies in a large freezer bag and give them a good whack with a rolling pin until they crumble finely. I’m kicking myself for not photographing the satisfaction of crushing a whole bag of Oreos—it’s therapy!
Step 2: Form the Dough
Pour the cookie crumbs into a big mixing bowl. Add your block of softened cream cheese. Now, get in there! Use a spatula or, better yet, your clean hands, and mix everything together. You are looking for a dense, slightly sticky dough that holds its shape when you squeeze it. If the mixture seems too dry, your cream cheese might have been too cold; add another teaspoon of cream cheese until it comes together.
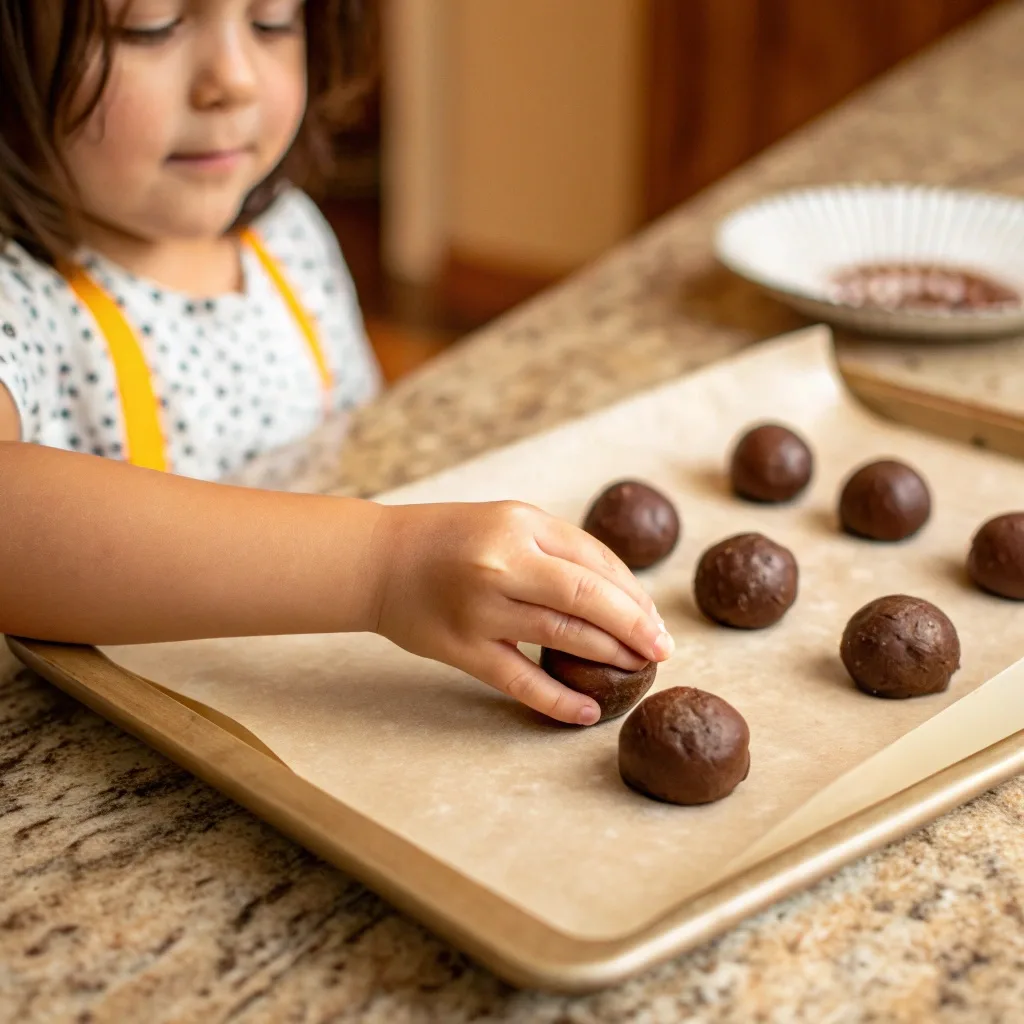
Step 3: Roll and Chill the Balls
Scoop the dough and roll it into smooth, one-inch balls. I use a small cookie scoop to keep them uniform, which makes the final product look polished and professional. Place all your Oreo truffle balls on a baking sheet lined with parchment paper. This is the crucial chilling step: Refrigerate the balls for at least 30 minutes. This makes them firm and stops them from melting and crumbling when you dip them into the warm chocolate.
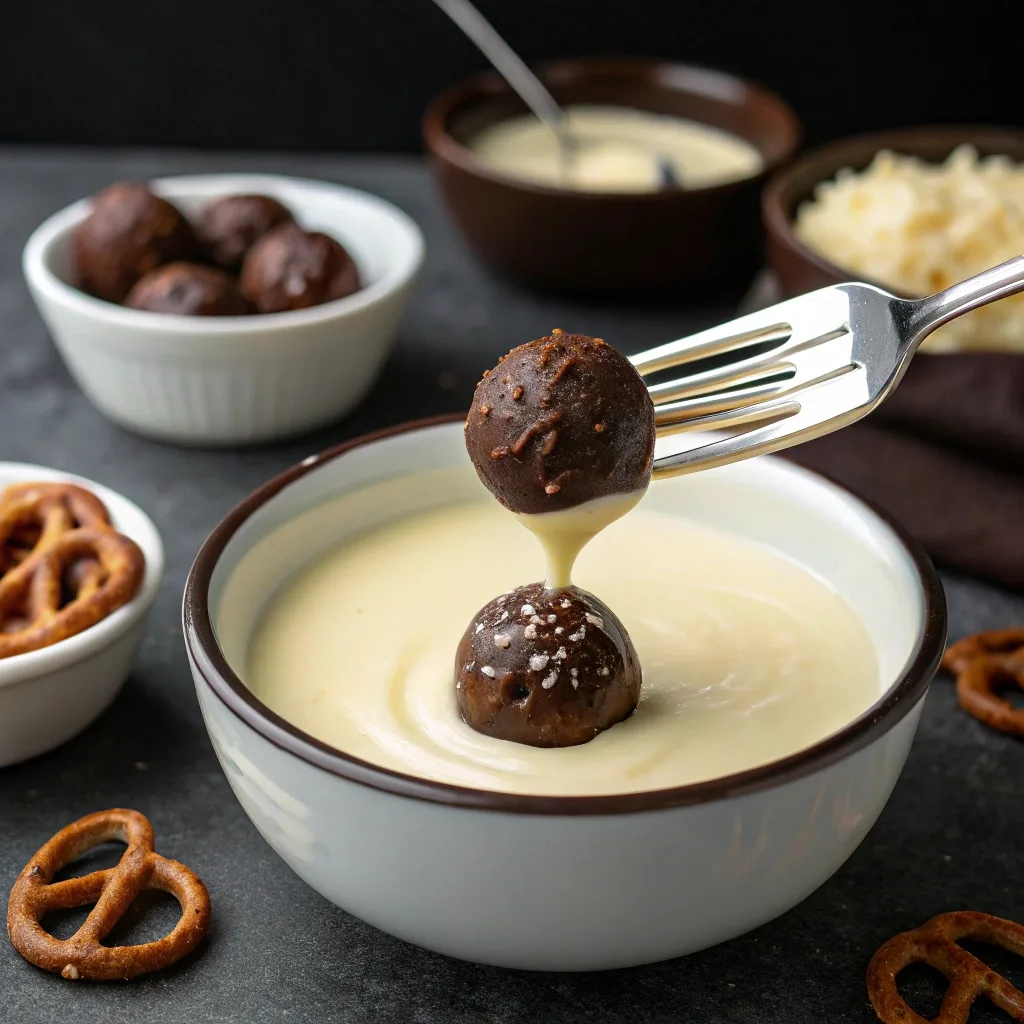
Step 4: Melt and Dip for the Perfect Ornament Look
While the truffles chill, melt your white and dark chocolate wafers in separate bowls. Melt them slowly—I use 30-second increments in the microwave, stirring well after each one, until they are silky-smooth. Remember: keep your chocolate warm enough to be fluid but cool enough not to melt the truffle ball!
- Take the chilled truffle balls out of the fridge.
- Drop a ball into the white chocolate, using a fork to gently turn it until it’s fully coated.
- Lift the truffle out with the fork, gently tapping the side of the bowl to let the excess chocolate drip off. This gives you a nice, clean coating.
- Place the dipped truffle back on the parchment paper.
- Immediately, before the white chocolate sets, press a small, one-inch piece of pretzel stick into the top of the truffle. This creates the adorable ornament hanger look!
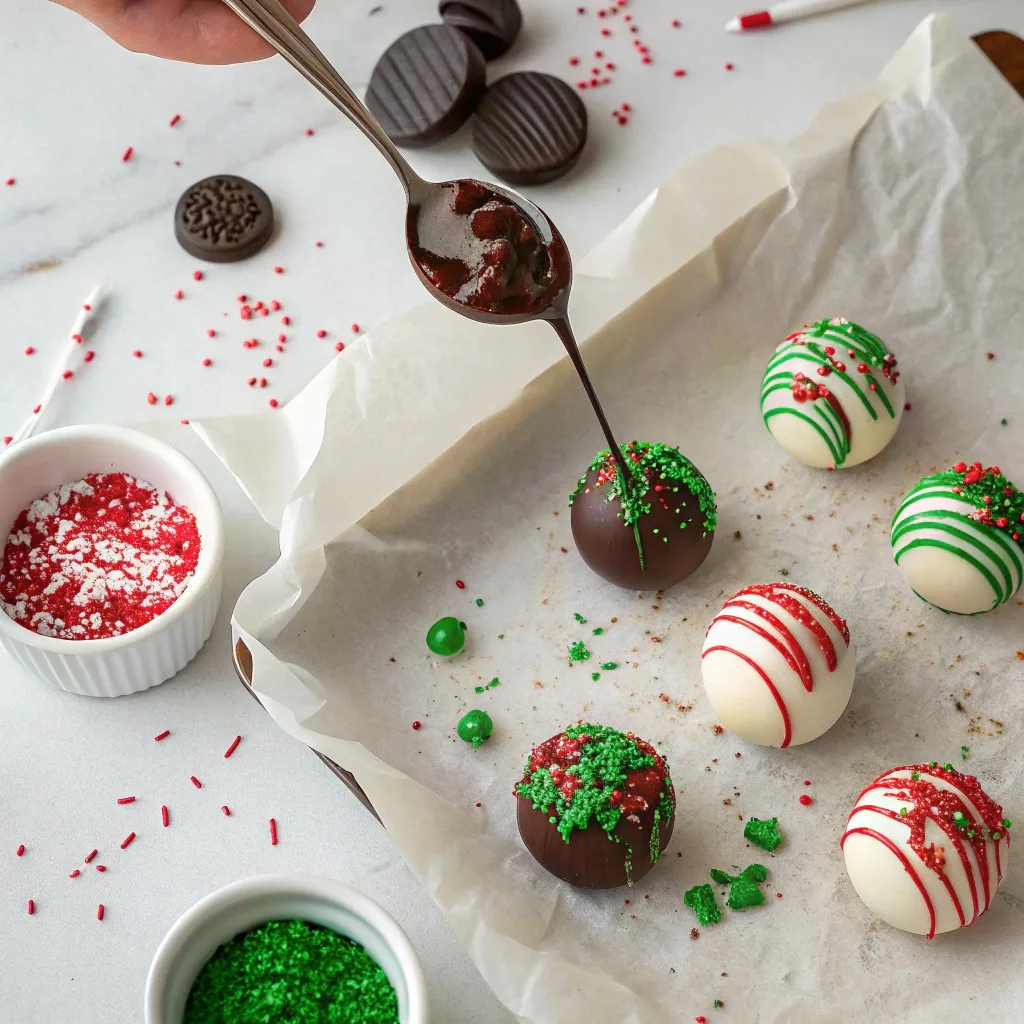
Step 5: Decorate and Set
Once the white chocolate is nearly set (it should still be tacky but not wet), take a fork, dip it into the contrasting dark chocolate, and quickly drizzle it over the white coating. Finish by showering the truffles with your colorful sprinkles right away. The key is to work quickly so the sprinkles stick before the chocolate hardens.
Let your finished Oreo Truffle Ornaments sit until the chocolate is completely set and shiny. This takes about an hour at room temperature or 15 minutes in the refrigerator.
What to Serve with Oreo Truffle Ornaments
These delightful truffles are rich, so pair them with something that offers a wonderful contrast in flavor, temperature, or texture.
- Drinks: A piping hot mug of homemade Slow Cooker Peppermint Hot Chocolate cuts through the richness beautifully. For the adults, a glass of cold milk or a coffee spiked with Irish cream is perfection.
- Savory Contrast: Serve them alongside a gorgeous, salty Holiday Charcuterie Board. The contrast between the salty meats, tangy cheeses, and sweet Oreo truffle ornaments is a powerful combination.
- Lighter Sides: A simple, refreshing bowl of fresh raspberries and blueberries offers a light, tart counterpoint to the dense chocolate.
Tips for Making It Perfect
Don’t sweat it if your first batch isn’t perfect; chocolate dipping takes a tiny bit of practice! These simple tips will help you create stunning results every time.
- Use the Right Cream Cheese: Make sure you use the brick of full-fat cream cheese and that it is fully softened. Cold cream cheese makes the dough crumbly and difficult to roll.
- Avoid Double Stuf: The extra filling in Double Stuf Oreos makes the mixture too greasy and sticky. Stick with the classic Oreo cookie for the best texture for your truffles.
- The Chocolate Dipping Trick: If your chocolate starts to look thick or seize up while dipping, stir in a tiny bit of coconut oil (1/4 teaspoon at a time) to thin it back out. If the chocolate starts to drag and pull the truffle apart, put the chocolate back in the microwave for 10-15 seconds to reheat it slightly.
- Keep Your Hands Clean (and Cool!): Wash your hands often while rolling the balls. Warm hands melt the mixture, making the truffles sticky. A quick rinse under cold water helps tremendously!
Storage Instructions
These Oreo Truffle Ornaments contain cream cheese, so you must store them correctly to maintain their texture and safety.
- Storage: Place the finished, set truffles in a single layer inside an airtight container. Keep the container in the refrigerator for up to 4 days. If you need to stack them, separate the layers with parchment or wax paper to prevent sticking.
- Freezing: Oreo truffles freeze beautifully! Place the finished ornaments on a baking sheet and freeze them until rock solid (about 2 hours). Transfer the frozen truffles to a freezer-safe zip-top bag or container. They will keep for up to 2 months.
- Reheating (Thawing): Thaw frozen truffles overnight in the refrigerator. We serve them cold, straight from the fridge—they taste absolutely phenomenal chilled!
General Information
Did you know that the modern concept of the truffle is actually rooted in pastry history?
The original Truffle au Chocolat, created in France in 1895, involved ganache rolled in cocoa powder—it was named for its resemblance to the prized fungus. Our modern Oreo Truffles are a brilliant evolution of that classic idea, moving from complex ganache to the simple, beloved combination of cream cheese and crushed sandwich cookies.
During the Great Depression in the United States, resourceful home cooks began relying on easy, inexpensive, no-bake desserts. Recipes that used shelf-stable items like cookies and condensed milk saw a massive surge in popularity. The concept of the Oreo truffle (or Oreo ball, as some call it) became a staple of American potlucks and holiday treat tables because it delivered maximum flavor with minimal effort and expense. They quickly became a symbol of simple, practical joy—exactly the kind of recipe we love at Moms Meals Daily!
Frequently Asked Questions
Why did my chocolate coating seize up?
Can I make these dairy-free?
How long do I need to chill the Oreo truffles?
What if the dough is too soft or too hard?
Do I have to use a pretzel for the ornament hanger?
Conclusion
These Magical Oreo Truffle Ornaments truly capture the spirit of the holidays—they are sweet, simple, and wonderfully decadent. Making them with my family is one of my favorite traditions, and I hope they become one of yours, too. Watching those creamy cookie balls turn into sparkling Christmas jewels reminds me that the best things in life are often the easiest ones to create.
If you love these no-bake treats, you must also try these other quick and easy holiday favorites!
- No-Bake Peanut Butter Fudge
- Peppermint Bark Puppy Chow
- Simple White Chocolate Cranberry Bark
- Four-Ingredient Haystack Cookies
- Easy Gingerbread Truffles
Happy cooking, friends!
Interactive Elements
Did you make these beautiful Oreo Truffle Ornaments? Please let me know how they turned out in the comments below! And if you post a photo, I would absolutely love to see it—please tag me on Pinterest!

Emily brings four years of dedicated baking experience and professional pastry-focused training to Moms Meals Daily. She oversees recipe validation and quality control to ensure every dessert performs consistently and reliably.

Oreo Truffle Ornaments Recipe
By Emily Hart
Ingredients
Instructions
Tools Needed
Save this recipe for later ❤️
Follow @mommealsdaily on Pinterest for easy dinners, desserts, and weekly inspiration.
Victoria Recipe | Easy Desserts & Dessert Recipes
Easy & Delicious Recipes
Follow for quick family-friendly recipes, baking inspiration, and comfort food favorites.
Follow on Pinterest