
Welcome to my kitchen, friends! I am so delighted you stopped by.
If there’s one scent that instantly transports me back to childhood Christmases, it’s the invigorating, cool blast of peppermint. It’s a magic flavor that shows up just when we need a little sparkle, and today, we are talking about the best way to deliver that holiday cheer: these incredible Peppermint Oreo Cheesecake Bites. They are everything a busy mom (or anyone, really!) dreams of in a holiday dessert: no-bake, utterly decadent, and bursting with festive flavor.
We are mixing up a rich, tangy cheesecake filling with a hint of cooling mint, folding it into crushed peppermint Oreo cookies, and then dipping the whole amazing ball of joy into a silky chocolate coating. Trust me, once you pop one of these little wonders into your mouth, you’ll understand why they disappear off the dessert platter so quickly. They are truly an unparalleled holiday treat!
If you love easy, everyday recipes that taste like a million bucks but don’t cost you an afternoon of stress, then you are in the right place! I’m Victoria—mom, home cook, and the heart behind Moms Meals Daily. 💛 I was born and raised in a cozy, food-loving family where meals were about connection and creating memories. I found so much joy helping my mom whip up simple, nourishing dishes. That love grew stronger when I became a mom myself. Juggling little ones, busy days, and the never-ending “What’s for dinner?” question made me realize I needed meals that were easy, nourishing, and real—and I knew other moms did too. That’s how Moms Meals Daily was born: out of a passion for sharing doable, everyday recipes that bring joy without the stress. I’m so glad you’re here. Welcome to my kitchen! 🍽️✨ (100 words)
Before you dive into this magnificent recipe, click the button below to subscribe to my weekly newsletter. You’ll get simple, family-friendly meals delivered straight to your inbox!
Overview of Recipe Content
These Peppermint Oreo Cheesecake Bites are little jewels of holiday indulgence. They are rich, creamy, and have that perfect balance of crunch from the Oreo crust and cooling zing from the peppermint. I adore serving them at cookie exchanges, holiday parties, or just keeping a secret stash in the freezer for when I need a moment of peace and chocolate.
What the recipe is and when to serve it: This is a no-bake, truffle-style dessert made from crushed Oreo cookies and a sweetened cream cheese mixture, flavored with peppermint. We shape them into balls and coat them in chocolate. They are perfect for Thanksgiving dessert tables, Christmas Eve appetizers, or New Year’s Day celebrations. Because they are served cold and hold their shape so well, they travel wonderfully, making them a delighted addition to any potluck.
Why readers will love it:
- No Oven Required! You won’t turn on your oven, which is a huge benefit when the rest of your kitchen is crammed with holiday meal prep.
- Make-Ahead Magic: You can make the entire batch days in advance and keep them chilled or frozen. This truly saves your sanity during the frantic holiday rush.
- Kid-Friendly: My kids absolutely love crushing the Oreos and rolling the mixture into balls. It’s a fun family activity!
- Spectacular Flavor: The creamy, tangy cheesecake filling paired with the dark chocolate and bright peppermint is an amazing flavor combination you won’t soon forget.
What it tastes like: Imagine a cross between a dense, fudgy chocolate truffle and a slice of creamy cheesecake, all brightened up with a winter mint flavor. The outside snaps with dark chocolate, giving way to a rich, soft, smooth interior that melts on your tongue. The crushed Oreos throughout give it a delightful, sturdy texture.
Health or seasonal benefits: Well, “healthy” is a relative term when we are talking about cheesecake and Oreos, but these bites are made with real, simple ingredients. Peppermint is a wonderful, natural winter flavor, and honestly, the greatest benefit is the sheer joy and comfort a tiny, homemade dessert brings to your busy season. These are portion-controlled, which is always a bonus when you’re tempted by all the holiday goodness!
Ingredients (bulleted)
- 1 (8 ounce) block cream cheese, softened to room temperature
- 1/2 cup (1 stick) unsalted butter, softened
- 2 cups powdered sugar, sifted (a quick sift prevents lumps!)
- 1 teaspoon pure vanilla extract
- 1 teaspoon pure peppermint extract (Start with 3/4 tsp and taste, adjusting as needed.)
- 3 cups crushed Peppermint Oreo cookies (about 36 cookies, use a food processor for a fine crumb)
- 1 pound melting chocolate (dark or white chocolate wafers/almonds bark work best for easy dipping)
- 1/2 cup crushed candy canes or peppermint candies, for garnish
Tools Needed
- Large mixing bowl and electric mixer (handheld or stand mixer)
- Food processor or a large zip-top bag and a rolling pin for crushing the cookies
- Rubber spatula
- Small cookie scoop (about 1.5 tablespoons)
- Baking sheet lined with parchment paper
- Double boiler or microwave-safe bowl for melting chocolate
- Fork or dipping tool
Substitutions and Additions
- For the Cookies: You can easily swap the Peppermint Oreos for classic Oreos and add an extra 1/4 teaspoon of peppermint extract to the cream cheese mixture for the same flavor. Gingerbread or golden Oreos would also make a wonderful base.
- For the Coating: Swap dark chocolate for white chocolate for a beautiful snowy look! You can also drizzle melted dark chocolate over a white chocolate coating (and vice versa) for a gorgeous, marbled finish.
- Extra Flavor: Add a pinch of sea salt to the cream cheese mixture—salt always makes chocolate taste better! You could also fold in 1/4 cup of mini chocolate chips for extra texture before rolling.
- Dietary Note: These bites contain dairy and gluten. For a gluten-free version, find a gluten-free chocolate sandwich cookie and substitute as directed.
How to Make Peppermint Oreo Cheesecake Bites
Making these gorgeous little truffles is far more simple than you might imagine. We are going to work through this in three easy parts: the filling, the chilling, and the dipping! Remember to use active voice as you walk through these steps!
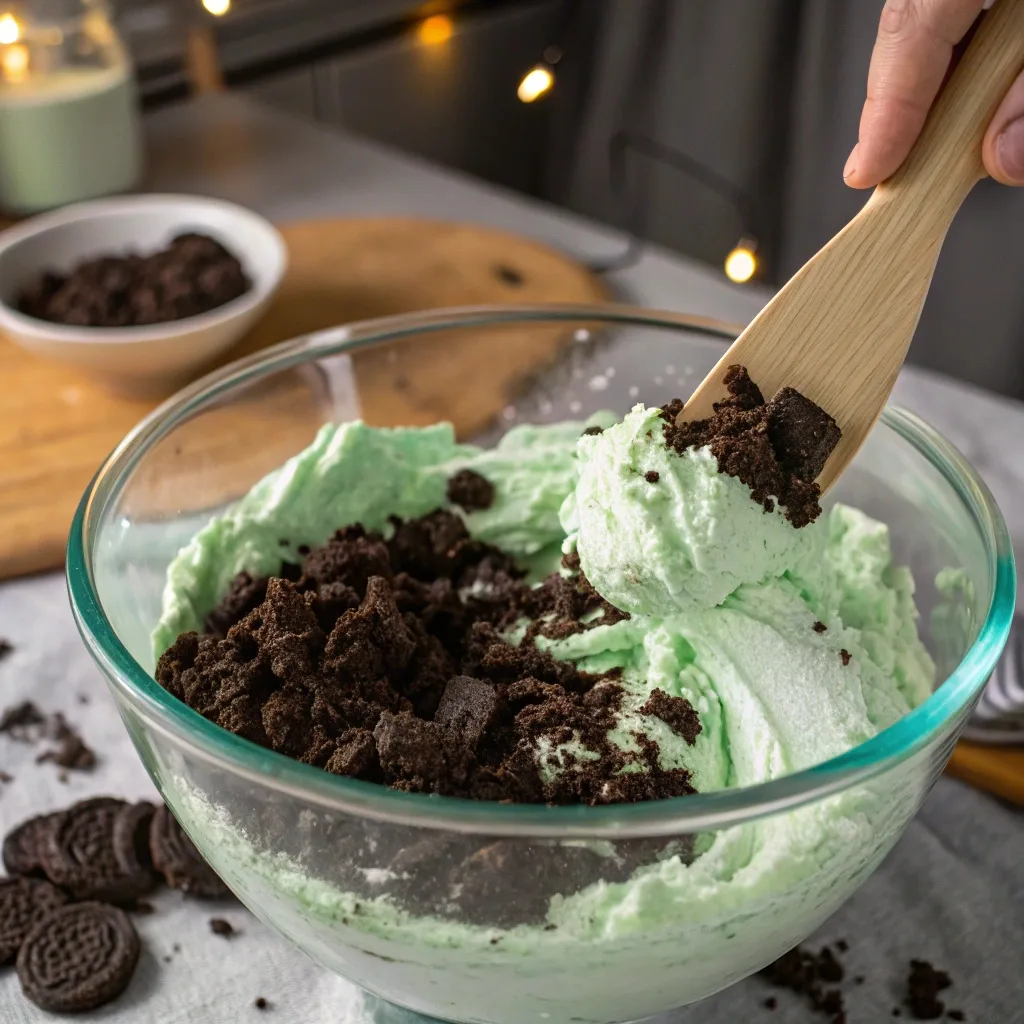
1. Crush Your Cookies: Grab your Peppermint Oreos! You need a fine crumb here—not chunks. I use my food processor and pulse until they look like coarse sand, including the white filling. If you don’t have a food processor, place them in a zip-top bag, seal it well, and pound them with a rolling pin. We want a fine powder to absorb the cream cheese beautifully. Set aside 1/2 cup of the crushed cookies for garnish and place the rest in a large mixing bowl.
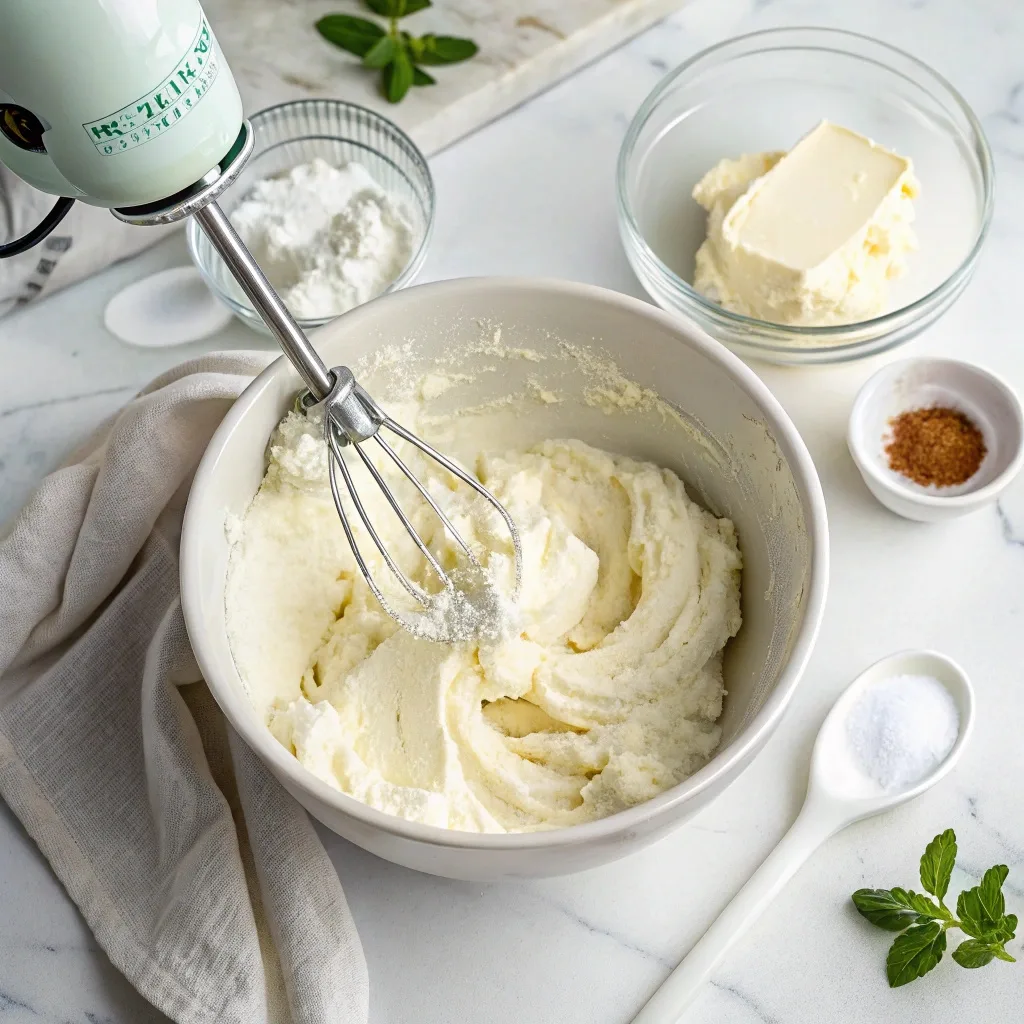
2. Whip the Creamy Filling: In a separate bowl, beat the softened cream cheese and softened butter together until the mixture is completely smooth and creamy. You don’t want any lumps of butter lingering! Next, gradually beat in the sifted powdered sugar until it is fully incorporated and the mixture is light and fluffy—this should take about 2-3 minutes. This step introduces air and gives the finished bite a lovely, airy texture. Finally, mix in the vanilla extract and the star of the show, the peppermint extract. Give it a taste. Do you want more mint? Add another splash!
3. Combine and Chill: Now, dump the creamy mixture right into the bowl with your crushed Oreo crumbs. Use a rubber spatula to fold everything together. You want to make sure you scrape the bottom of the bowl and mix until everything is evenly combined and you see a rich, dark color throughout. The mixture will be soft and sticky—that’s perfect. Cover the bowl with plastic wrap and chill the mixture in the refrigerator for at least 1 hour, or until it’s firm enough to easily roll into balls. This chilling step is critical for preventing a messy headache later!
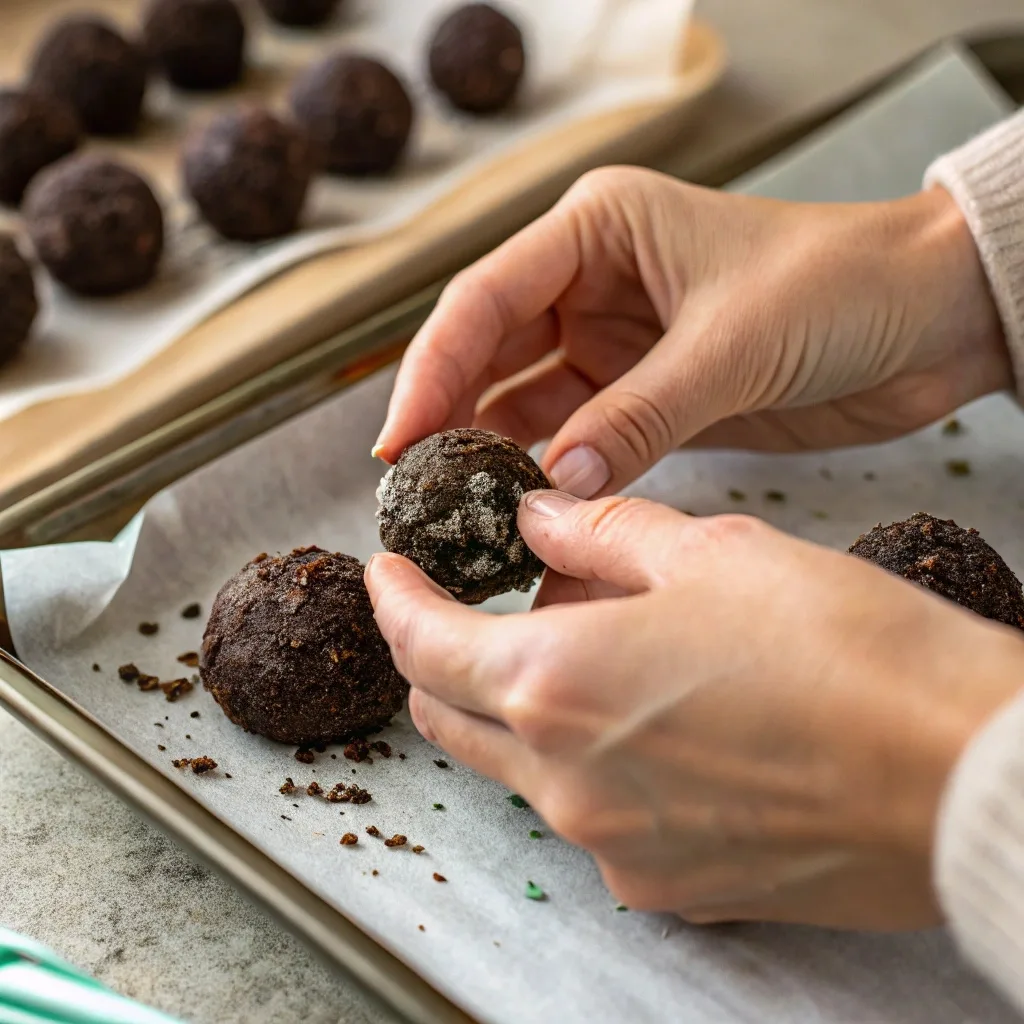
4. Roll the Bites: Line a baking sheet with parchment paper. Use a small cookie scoop to portion out the mixture. This is an essential tip for making sure all your bites are uniform in size! Roll each portion quickly between your palms to form a smooth ball. Place them onto the prepared baking sheet. Once all the balls are rolled, return the tray to the freezer for about 15-20 minutes. Freezing them before dipping is the secret to preventing the warm chocolate from melting the filling.
5. Dip and Decorate: In a microwave-safe bowl or a double boiler, melt your chocolate until it is completely smooth and luscious. Work quickly but carefully: using a fork or a dipping tool, drop one frozen cheesecake ball into the melted chocolate. Turn it gently until it is fully coated. Lift the bite out, letting the excess chocolate drip back into the bowl. Immediately place the dipped bite back onto the parchment paper. While the chocolate is still wet, sprinkle the top with the remaining crushed Oreo crumbs, crushed candy canes, or a drizzle of contrasting chocolate. Let the bites set completely on the counter or, for a faster set, pop them back into the freezer for 5-10 minutes.
What to Serve with Peppermint Oreo Cheesecake Bites
These small, cold, sensational treats pair perfectly with warm, comforting drinks and simple sides. They are rich, so you want to choose pairings that offer a refreshing contrast or a warm, cozy companion.
Pairing Ideas:
- Hot Drinks: A mug of homemade Slow Cooker Hot Cocoa is the ideal companion. The creamy cocoa is such a classic pairing for peppermint. For the adults, a strong cup of coffee or a minty latte will work wonders.
- Simple Sides/Snacks: Serve these alongside a platter of simple, buttery cookies like my Cranberry Orange Scones. The bright citrus and tart cranberry offers a wonderful contrast to the rich chocolate.
- Complementary Sweets: If you’re building a cookie platter, fill it out with other no-bake items that offer a different texture, like my No-Bake Gingerbread Truffles or even my Easy 3-Ingredient Fudge. The different shapes and flavors make the spread look lavishly festive.
- Drinks: A simple glass of ice-cold milk is always a terrific choice with chocolate. You can’t go wrong!
Tips for Making It Perfect
I want you to succeed on your first try, so pay close attention to these simple, but important tips!
- The Softened Ingredients are Key: Don’t skip softening your cream cheese and butter! Use true room temperature ingredients. If they are cold, you will end up with a lumpy filling and it will be impossible to achieve that smooth, creamy texture we are aiming for.
- Use Melting Wafers: While chocolate chips will work, they contain stabilizers that prevent them from melting into a smooth, dip-friendly coating. I highly recommend using high-quality melting wafers, also known as chocolate bark or candy coating. It will save you a ton of panic and effort.
- Make-Ahead Advice: These bites only get better as they chill. Make them up to 3 days in advance and keep them covered in the refrigerator. Just a note: do not garnish with the crushed candy canes until a few hours before serving, as the moisture from the air can start to melt the candy canes.
- Common Pitfall: Dipping Temperature: If the chocolate is too hot, it melts your cheesecake ball. If it’s too cold, it gets chunky and gloppy. Melt your chocolate gently and let it cool for a minute or two before you start dipping. Use the freezer step to make absolutely sure your balls are rock solid before their chocolate bath.
Storage Instructions
One of the truly great things about these Peppermint Oreo Cheesecake Bites is how beautifully they store.
How to store: Place your finished, set bites in an airtight container. Keep them layered between sheets of parchment or wax paper to prevent sticking. Store them in the refrigerator for up to 5 days.
How to freeze: For longer storage, these freeze like a dream! Once they are fully set and the chocolate is hard, transfer the parchment-lined tray to the freezer. Once they are frozen solid, transfer them to a freezer-safe, airtight container (again, layered with parchment). They will keep well for up to 2 months.
How to reheat leftovers: No need to reheat! These are served chilled or even frozen. If eating from frozen, simply pull a few out about 15-20 minutes before you plan to enjoy them to let them soften slightly. The colder they are, the more sturdy and dense the filling will be.
General Information
Cheesecake is an ancient dessert, tracing its roots back to ancient Greece! But the style of no-bake, refrigerated cheesecake we enjoy today is a much more modern American invention, made possible by the introduction of cream cheese in the late 1800s. These truffle-style bites are an extension of the classic Oreo balls—a simple American party staple.
The combination of mint and chocolate has an unusual and fascinating history! It gained massive popularity in the US in the 1970s, making it a nostalgic flavor profile for many of us. Peppermint, in particular, is synonymous with winter and Christmas because the candy cane, a shepherd’s crook shape, became a popular holiday decoration in the 19th century. My nonna always said, “If it’s minty, it’s a winter hug!” I’m kicking myself for not photographing the first time I made these—they looked like magical little snowballs!
Frequently Asked Questions
Can I use low-fat cream cheese or butter?
Why is my chocolate coating getting clumpy when I dip?
How can I crush the Oreos without a food processor?
Can I make these without peppermint extract?
Do I have to refrigerate these?
Conclusion
I am so grateful we made these Peppermint Oreo Cheesecake Bites together. These little chocolate-dipped wonders are truly the perfect, stress-free addition to your holiday dessert table. They capture the spirit of the season in one simple, creamy bite, reminding us that the best memories are often made over the easiest of treats. Whether you’re making a triple batch for a neighborhood party or just a small batch for your own family, you are bringing joy to the table.
If you loved this recipe and are looking for other easy, family-friendly meals to keep you grounded during the busy season, make sure you try my Quick Chicken Pot Pie Soup—it’s amazing for a cozy weeknight dinner! Also, don’t miss my No-Bake Pumpkin Cheesecake Bars for another simple holiday dessert that tastes superior.
I would love to see how your beautiful Peppermint Oreo Cheesecake Bites turn out! Did you use white chocolate or dark chocolate? Did you add a secret ingredient? Leave a comment below and share your photos!
And if you’re looking for more simple recipe ideas, be sure to tag me on Pinterest when you make this recipe! Find more inspiration on Pinterest

Emily brings four years of dedicated baking experience and professional pastry-focused training to Moms Meals Daily. She oversees recipe validation and quality control to ensure every dessert performs consistently and reliably.
Victoria Recipe | Easy Desserts & Dessert Recipes
Easy & Delicious Recipes
Follow for quick family-friendly recipes, baking inspiration, and comfort food favorites.
Follow on Pinterest