There’s something magical about a birthday cake — that enchanting centerpiece of celebration that brings everyone together, ignites joy, and evokes fond memories. Whether it’s the anticipation of blowing out candles or the sheer delight of a slice of cake, the birthday cake is a time-honored tradition that transcends generations. It’s why I’m so excited to share this Red Velvet Birthday Cake recipe with Cream Cheese Frosting & Velvet Texture — a culinary creation that not only tastes divine but also looks stunning at any birthday gathering.
Table of Contents
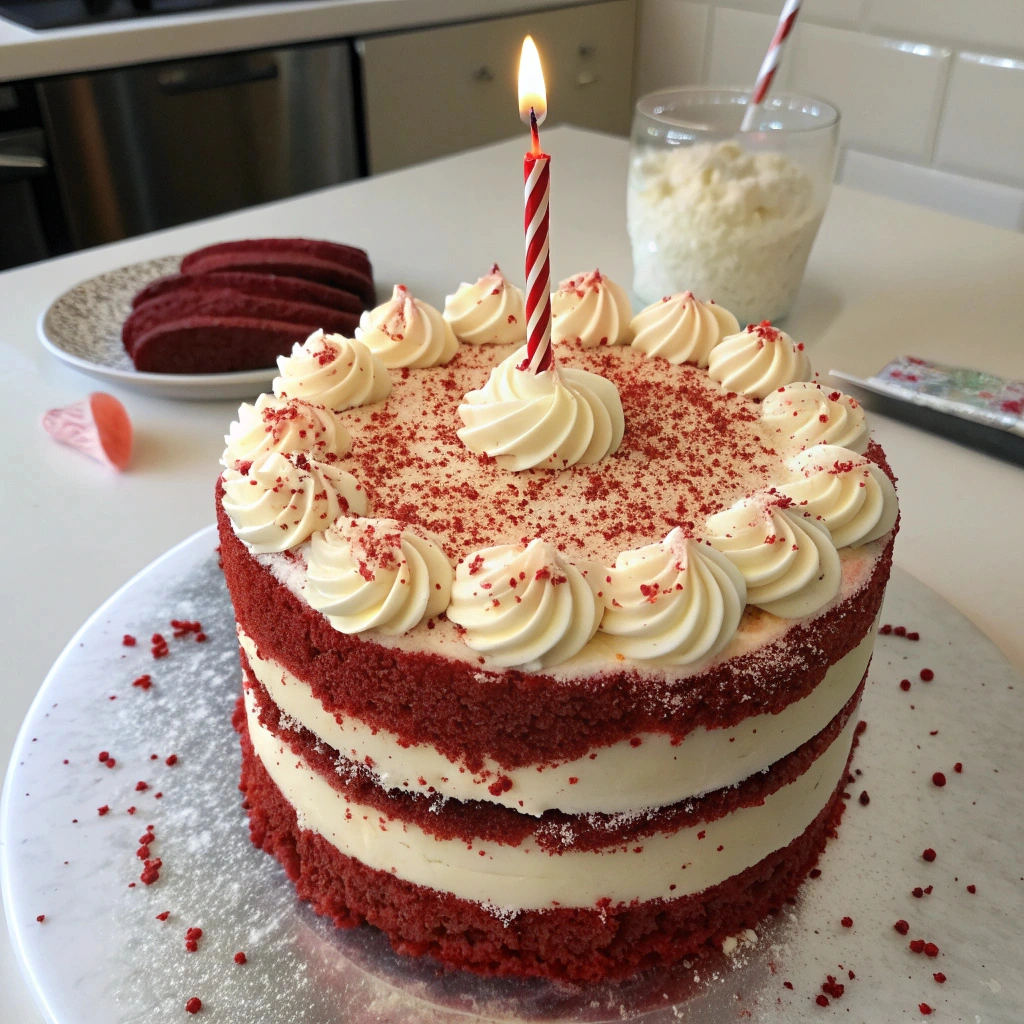
Originating from the South, the rich history of red velvet cake is intertwined with notions of luxury and elegance, celebrated for its vibrant hue and decadent flavor. Its subtle cocoa taste blended with the tangy notes of buttermilk and creamy frosting create a symphony of flavors, while its velvety texture is the epitome of cake perfection. This cake is not just about celebrating turning a year older; it’s about crafting unforgettable memories around the dining table, surrounded by loved ones, laughter, and of course, incredible food.
So, my friends, if you love cozy recipes like this, subscribe to my email list!
Overview of Recipe Content
This Red Velvet Birthday Cake is a delectable showstopper, making it one of the prettiest birthday cakes you can serve. It’s perfect for birthdays, anniversaries, or any celebration that calls for something special. Each slice offers a sweet yet slightly tangy flavor with a tender, velvety crumb, which always leaves you craving more.
Readers will love this recipe for its simplicity and the comforting flavors of home. It’s customizable, whether you want to add sprinkles for a festive touch or keep it more minimalist for a sophisticated look — the choice is yours! It’s also worth noting that red velvet cake often features ingredients that celebrate the bounty of the seasons, like buttermilk and cocoa, bringing a bit of joy to your pastry journey any time of year.
Ingredients

For the Cake:
- 2 ½ cups all-purpose flour
- 1 ½ cups granulated sugar
- 1 teaspoon baking soda
- 1 teaspoon salt
- 1 teaspoon cocoa powder
- 1 cup vegetable oil
- 1 cup buttermilk, room temperature
- 2 large eggs, room temperature
- 2 tablespoons red food coloring
- 1 teaspoon vanilla extract
- 1 teaspoon white vinegar
For the Cream Cheese Frosting:
- 1 cup unsalted butter, softened
- 1 package (8 oz) cream cheese, softened
- 4 cups powdered sugar
- 1 teaspoon vanilla extract
- 2 tablespoons heavy cream (optional, for fluffier frosting)
Tools Needed
- Mixing bowls (2 large)
- Hand mixer or stand mixer
- Rubber spatula
- Measuring cups and spoons
- Cake pans (two 9-inch round pans)
- Cooling rack
- Offset spatula for frosting
Suggested Substitutions and Additions
For those with dietary restrictions or preferences, this recipe allows for several substitutes:
- Gluten-Free: Use a gluten-free all-purpose flour blend to make this cake gluten-free.
- Dairy-Free: Swap the buttermilk with almond or coconut milk combined with a teaspoon of vinegar.
- Flavor Enhancements: Add a teaspoon of espresso powder to deepen the chocolate flavor. You can also incorporate a touch of cinnamon for a warm hint of spice.
- Toppings: Decorate the cake with fresh berries or edible flowers for a charming aesthetic.
How to Make Red Velvet Birthday Cake Recipe with Cream Cheese Frosting & Velvet Texture
Step 1: Preheat Your Oven and Prepare Cake Pans
Preheat your oven to 350°F (175°C). Grease and flour your 9-inch round cake pans. This helps create a non-stick surface for the cake and gets it ready to rise to fluffy perfection.
Step 2: Mix the Dry Ingredients
In a large mixing bowl, whisk together the flour, sugar, baking soda, salt, and cocoa powder. The vanilla scent wafting from the sugar and cocoa is just the start of the delight to come.
Step 3: Combine the Wet Ingredients
In another bowl, blend the vegetable oil, buttermilk, eggs, red food coloring, vanilla extract, and vinegar. This vibrant mixture is sure to inspire smiles as you bring together the richness of flavors.
Step 4: Combine Both Mixtures
Slowly add the wet mixture into the dry ingredients, using your electric mixer on low speed until just combined. Don’t overmix; you want to maintain that airy texture. The colors will combine beautifully, creating a mixture that’s as much a feast for the eyes as for the palate.
Step 5: Bake the Cakes
Divide the batter evenly between the prepared pans. Place them in the oven and bake for 25–30 minutes or until a toothpick inserted in the center comes out clean. The aroma will fill your home, inviting everyone to anticipate the treat that’s rising in the oven.
Step 6: Cool the Cakes
Once baked, remove the cake pans from the oven and let them cool in the pans for about 10 minutes. Then, transfer them to a cooling rack to cool completely. Patience is key here — the texture will become even more delicate as it cools.
Step 7: Make the Cream Cheese Frosting
While the cake cools, beat the softened butter and cream cheese in a mixing bowl until creamy and smooth. Gradually add the powdered sugar, mixing on low speed until well combined. Finally, add the vanilla extract and heavy cream, mixing until fluffy and light — the frosting should be a heavenly texture that spreads easily.
Step 8: Assemble the Cake
Once the cake layers are completely cool, place one layer on a serving plate. Spread a generous layer of cream cheese frosting on top, then place the second layer on top. Use the remaining frosting to cover the sides and top of the cake. Feel free to add decorative touches like sprinkles or edible flowers for an aesthetic cake design.
What to Serve with Red Velvet Birthday Cake Recipe with Cream Cheese Frosting & Velvet Texture
This decadent cake pairs beautifully with:
- Side Dishes: Serve with a simple fruit salad or a scoop of vanilla ice cream to complement the rich flavors.
- Drinks: A glass of chilled milk or a warm cup of coffee makes a perfect accomplice.
- Garnishes: Dust with a sprinkle of cocoa powder or additional sprinkles for added charm.
If you’re looking for related recipes, try my Moist Chocolate Cake or Vanilla Bean Cupcakes for more delightful dessert options.
Tips for Making It Perfect
- Prep-ahead advice: Bake the cake layers a day in advance and store them tightly wrapped in plastic wrap. This allows the flavors to deepen and makes frosting easier.
- Fixing common mistakes: If your cake sinks, it may have been underbaked. Use a toothpick to test — it should come out clean.
- Texture adjustments: For an even lighter cake, separate the egg whites and whisk them until stiff peaks form, then fold gently into the batter before baking.
- Doubling: This recipe is easily doubled for a larger crowd; simply adjust your baking time accordingly based on the quantity you make.
Storage Instructions
- Refrigerator storage: Store leftover cake in an airtight container in the fridge for up to a week.
- Reheating: Enjoy it cold, or microwave a slice for 10-15 seconds for a warm treat.
- Make-ahead options: You can prepare the cake layers ahead and freeze them wrapped tightly in plastic wrap for up to three months.
- Freezing recommendations: Frosted cake can be frozen as well — just ensure it’s well-covered to prevent freezer burn.
General Information
Red velvet cakes trace their origins back to the early 20th century, primarily popularized in the Southern United States. The cake was originally a byproduct of the reaction between acidic ingredients like buttermilk and cocoa powder, resulting in that beautiful red hue. Today, red velvet cakes are celebrated not just for their charming flavor but also for their striking appearance.
Frequently Asked Questions
- Can I use a different type of food coloring? Yes, gel food coloring works well to achieve a vibrant color without adding excess liquid.
- How long can I store the cake? The cake can be stored in the refrigerator for up to 7 days.
- Why is my cake too dense? Overmixing the batter can lead to a dense texture; be gentle when combining the wet and dry ingredients.
- Can I make this gluten-free? Substitute with gluten-free flour, ensuring proper ratios to maintain texture.
Conclusion
This Red Velvet Birthday Cake is a delightful celebration of flavor, texture, and unforgettable memories. Its velvety crumb and tangy cream cheese frosting create a stunning experience sure to be the highlight of any birthday bash. With its ease of preparation and endless adaptability, it’s a recipe you’ll want to keep close to your heart.
If you’re looking for indulgent dessert recipes, don’t miss my classic Chocolate Layer Cake or Coconut Cream Cake.
Until next time, happy baking, and enjoy every moment around the table!
Interactive Elements
I invite you to leave a comment or review to share your experiences with this recipe. If you make this cake, please share a photo on Pinterest! You can also tag me on Instagram with your beautiful creations.
Nutritional Information
Approximate nutritional values per serving:
- Calories: 450
- Protein: 4g
- Carbohydrates: 65g
- Fat: 20g
- Fiber: 1g
- Sodium: 360mg

Emily brings four years of dedicated baking experience and professional pastry-focused training to Moms Meals Daily. She oversees recipe validation and quality control to ensure every dessert performs consistently and reliably.
Red Velvet Birthday Cake Recipe with Cream Cheese Frosting & Velvet Texture
By Emily Hart
Ingredients
Instructions
Tools Needed
Save this recipe for later ❤️
Follow @mommealsdaily on Pinterest for easy dinners, desserts, and weekly inspiration.
Victoria Recipe | Easy Desserts & Dessert Recipes
Easy & Delicious Recipes
Follow for quick family-friendly recipes, baking inspiration, and comfort food favorites.
Follow on Pinterest