
Every Valentine’s Day in our home, the kitchen becomes a cozy blend of cocoa, sugar, and laughter. I’m Victoria — the mom behind Mom’s Meals Daily — and these Red Velvet Heart Shaped Cut Out Cookies hold a special place in my heart. They started as a way to keep my little ones busy while we waited for the chocolate cake to bake, but soon became a family tradition that no Valentine’s felt complete without.
Table of Contents
When I first baked them, I remember pulling out a box of Red Velvet Cookies from Cake Mix Easy—I had a leftover mix from my holiday Christmas Themed Cake. My daughter Lily, then six, insisted that the cookies “had to be heart-shaped because love tastes better that way.” She was right. The buttery red dough, tinged with cocoa and vanilla, baked into the most tender, crumbly hearts that melted in your mouth like a cake slice kissed by Cupid.
If you’ve ever baked Red Velvet Cupcakes or scrolled through endless Red Velvet Cake Recipes, you already know the magic of that deep crimson hue. It’s rich, elegant, and feels like dessert dressed up for a special occasion. These cookies are that same charm — portable, shareable, and perfect for gifting. I even made a New York Style Cookies twist one year, adding white chocolate chunks and a chewy center. That’s how versatile this recipe is.
My husband calls them “love tokens,” and my kids call them “heart happiness.” I just call them heaven. Whether you’re new to baking or a seasoned home chef, this recipe delivers that bakery-style finish without the fuss. You’ll love how simple and quick it is — no chilling, no complicated steps — just pure, delicious joy.
If you adore Red Velvet Desserts as much as we do, don’t miss my other favorites on the blog like Classic Red Velvet Layer Cake and Chewy Red Velvet Brownies. Each recipe is built on love, cocoa, and the same family-tested flavor that makes holidays so memorable.
Recipe Essentials
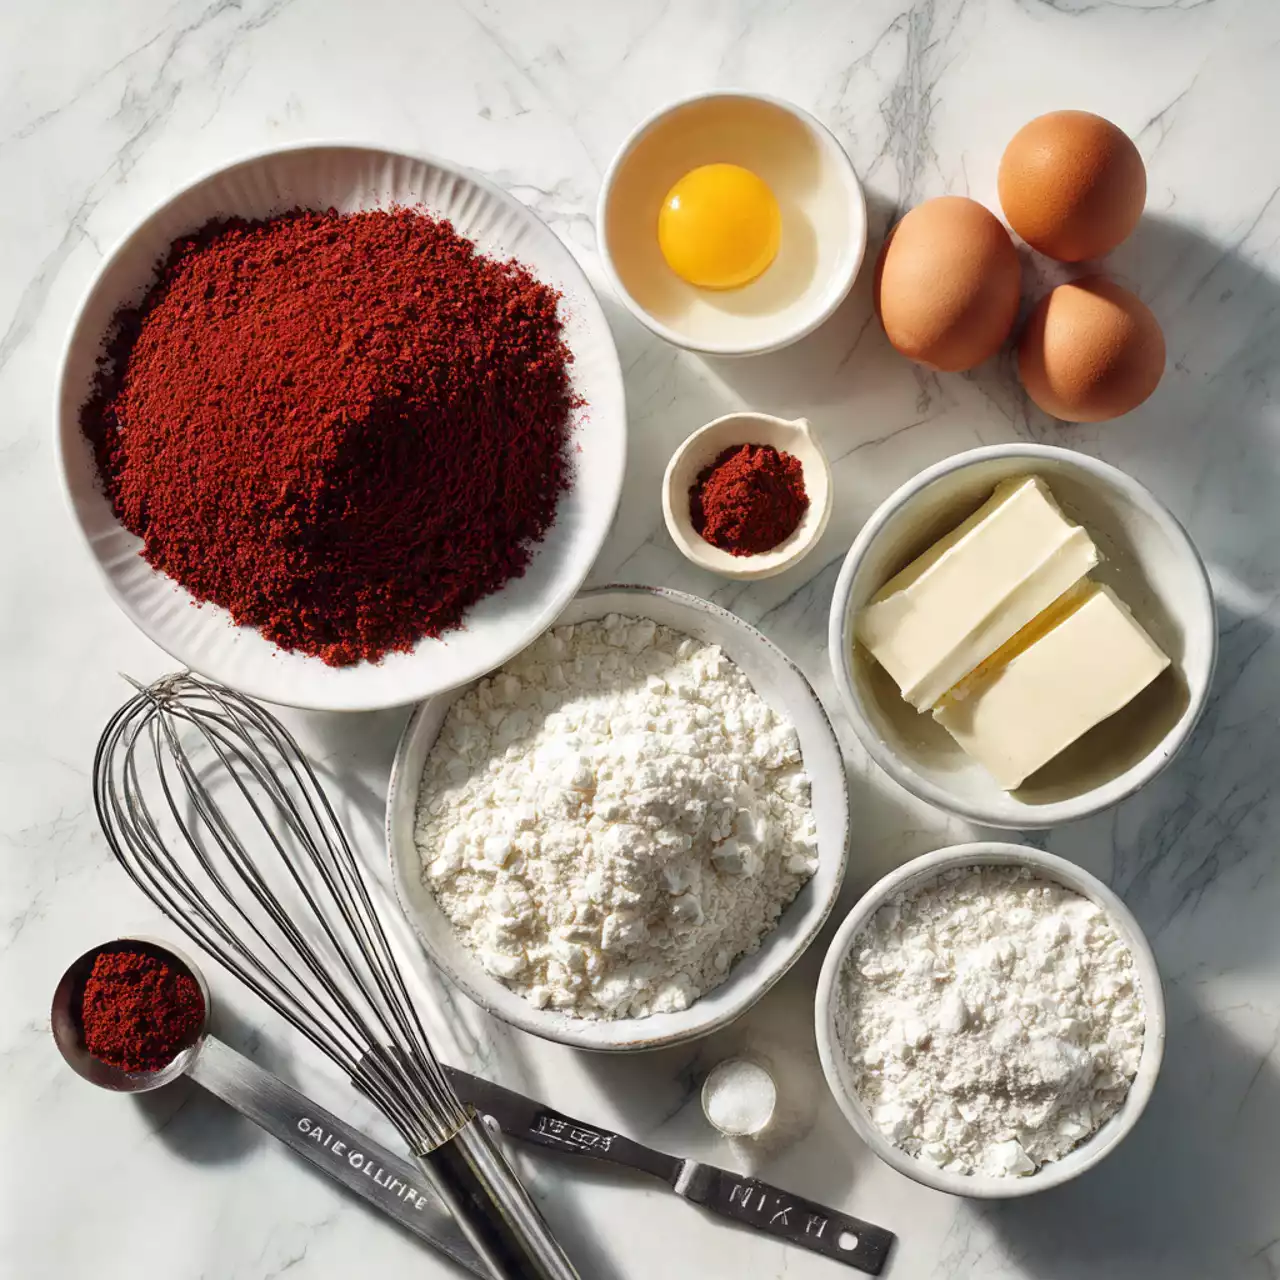
To make Red Velvet Heart Shaped Cut Out Cookies, you’ll only need a handful of pantry staples and one key ingredient — love. But before you roll up your sleeves, let’s talk about why each component matters.
- Cake Mix – Using a boxed red velvet cake mix makes this recipe unbelievably easy. It’s the foundation for that signature red color and chocolatey undertone.
- Butter – Adds richness and helps create that soft yet structured texture perfect for cut-out cookies.
- Eggs – They bind the dough and give it a tender crumb.
- Flour – A bit of extra flour ensures the dough is easy to roll and cut.
- Cocoa Powder – Deepens the color and flavor.
- Vanilla Extract – Rounds out the flavors beautifully.
- Cream Cheese Frosting – Optional but divine as a finishing touch.
These cookies aren’t just delicious; they’re versatile. You can shape them for any season — hearts for Valentine’s Day, stars for Christmas, or circles for everyday treats. They’re even wonderful for cookie exchanges alongside Raisin Cookies and Galletas Red Velvet.
Here’s a quick ingredient table for reference:
| Ingredient | Quantity |
|---|---|
| Red Velvet Cake Mix | 1 box (15.25 oz) |
| All-purpose Flour | 1/4 cup |
| Unsalted Butter, softened | 1/2 cup |
| Eggs | 2 large |
| Vanilla Extract | 1 tsp |
For those who love baking inspiration, explore my guide on Easy Holiday Cookie Swaps — it’s full of creative flavor combinations.
How to Make It
1. Preheat the oven.
Begin by preheating your oven to 350°F (175°C). This ensures your cookies bake evenly and get that perfect soft center with slightly crisp edges. Line two large baking sheets with parchment paper or silicone mats — this not only prevents sticking but also keeps your cookie bottoms beautifully golden instead of too brown.
2. Mix the dry ingredients.
In a large mixing bowl, whisk together your red velvet cake mix and flour until the color is consistent throughout. This quick blend helps avoid any lumps and gives you that deep, luxurious red tone. If you love a stronger cocoa flavor, add a tablespoon of cocoa powder here. It gives the cookies a bolder “bakery-style” taste, similar to classic New York Style Cookies but with that Valentine-red twist.
3. Add the wet ingredients.
Now, add your softened butter, eggs, and vanilla extract to the dry mixture. Using a handheld mixer or a sturdy wooden spoon, blend everything until a thick dough forms. The texture should feel slightly tacky but not sticky. If it’s too soft, sprinkle in a little extra flour — about a tablespoon at a time — until it holds its shape. This step fills your kitchen with that familiar sweet vanilla scent that feels like home.
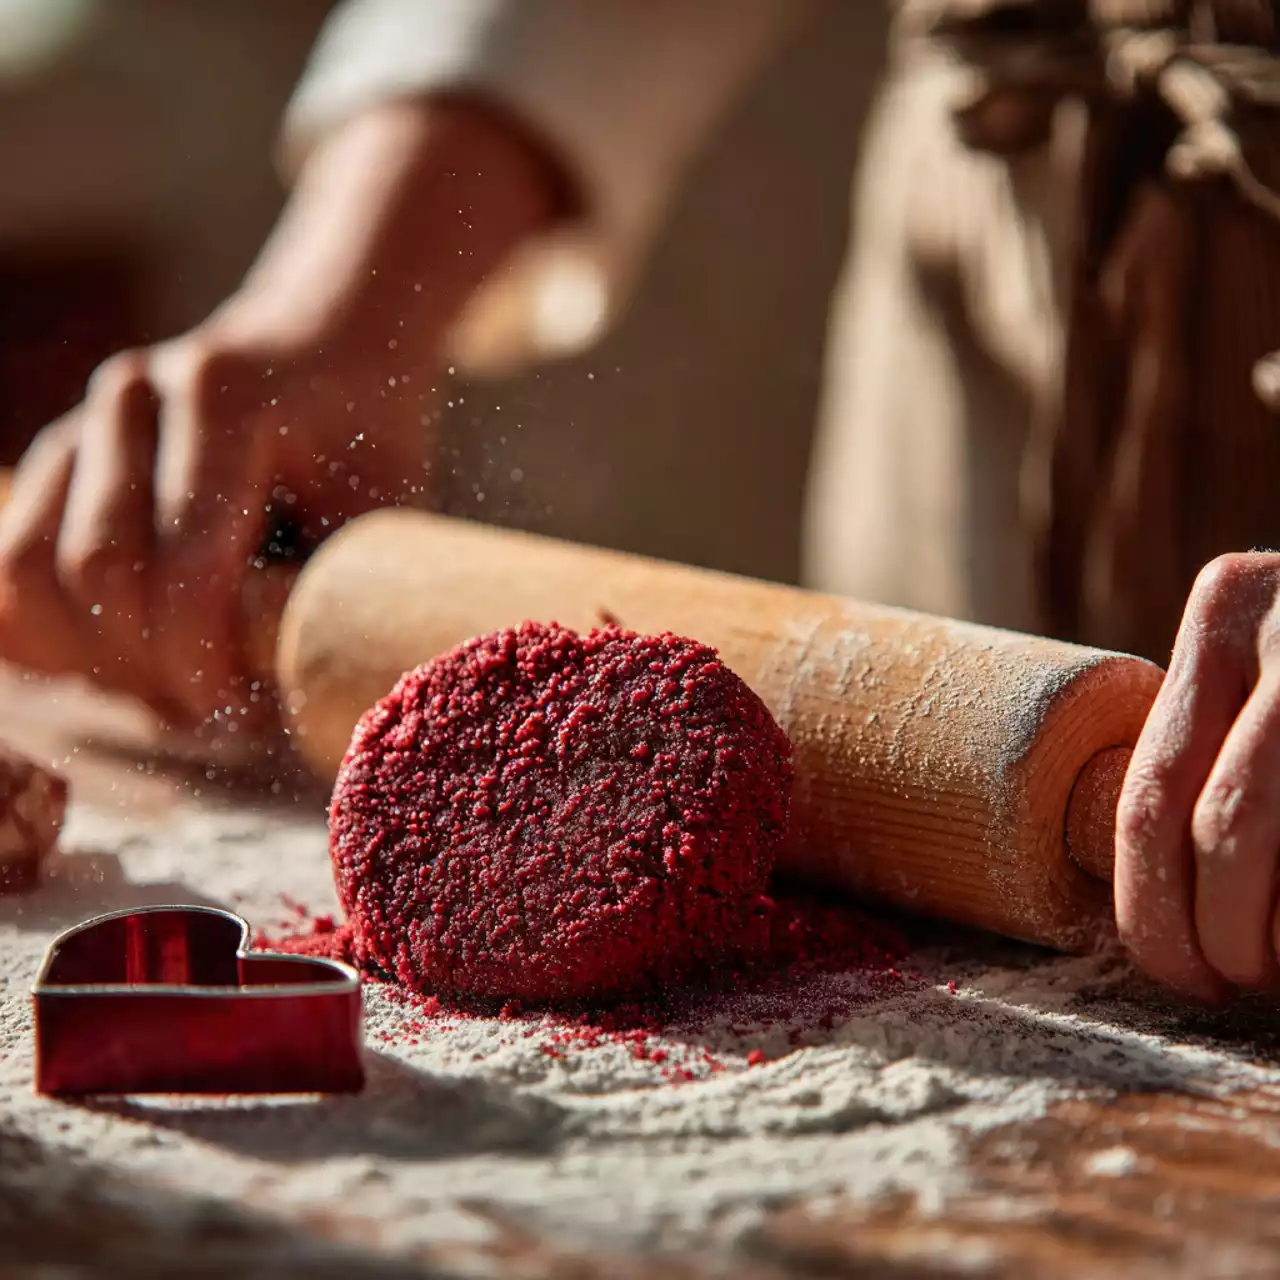
4. Roll out the dough.
Dust your countertop lightly with flour and turn the dough onto it. Roll it out gently to about ¼ inch thickness — thick enough to stay soft inside, yet firm enough to hold those lovely heart edges. Don’t overwork the dough; a few smooth passes with the rolling pin are plenty. Overmixing can make cookies tough, and these are meant to be tender and melt-in-your-mouth.
5. Cut into hearts.
This is where the fun begins — grab your heart-shaped cookie cutter and press it into the dough. Kids love helping with this part, and it’s the perfect family activity for Valentine’s week. Collect the scraps, re-roll, and cut again until all the dough is used. Each heart represents a little handmade love, ready to bake.
6. Bake to perfection.
Transfer your cut-out hearts onto the prepared baking sheets, spacing them about 2 inches apart. Bake for 8–10 minutes, just until the edges are set but the centers still look slightly soft. Remember, cookies continue to bake as they cool, so don’t overdo it. The moment you open the oven, you’ll smell that unmistakable red velvet aroma — a mix of cocoa, vanilla, and sweet butter that instantly feels like Valentine’s Day.
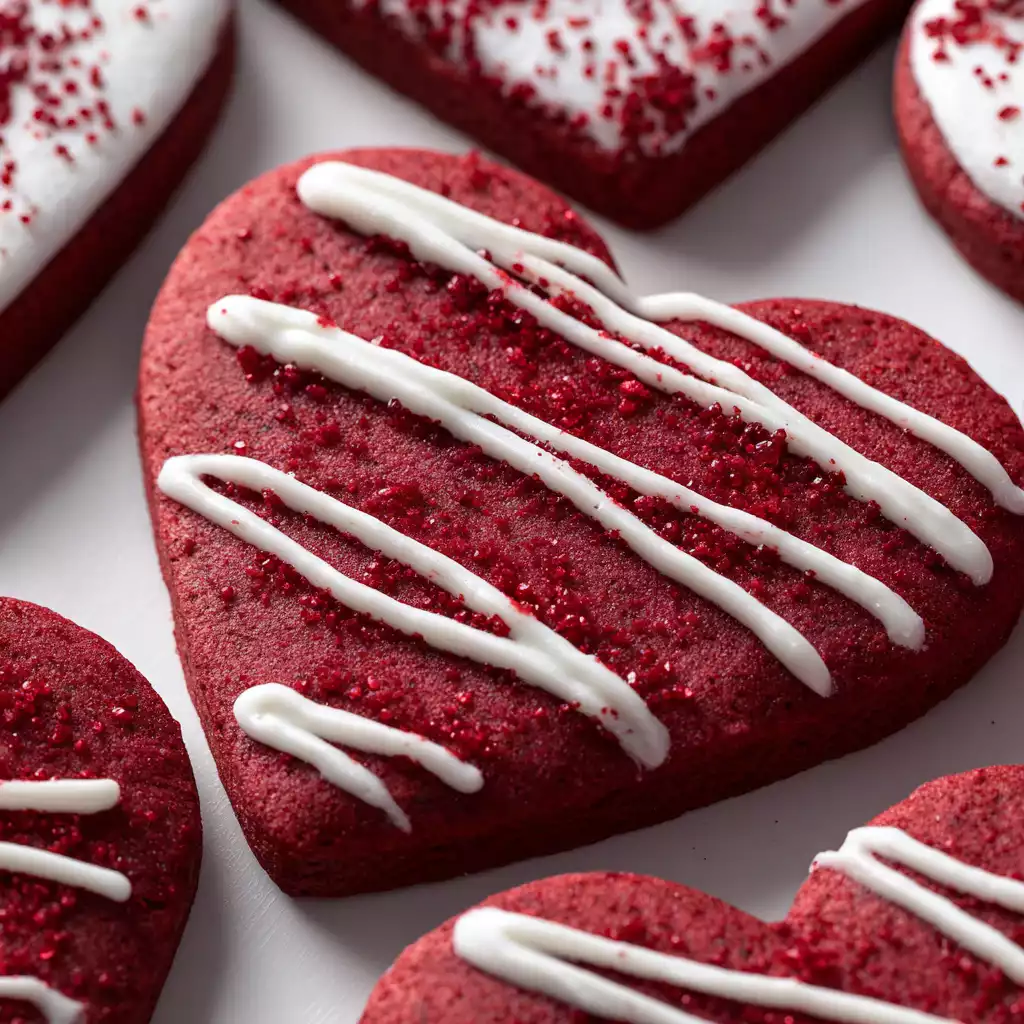
7. Cool and decorate.
Allow the cookies to cool on the sheet for about 5 minutes before moving them to a wire rack. Once completely cooled, you can dust them with powdered sugar, drizzle melted white chocolate, or spread a layer of cream cheese frosting for that true Red Velvet Desserts look.
8. Optional twist – make sandwich cookies!
For an extra treat, spread a generous layer of cream cheese frosting between two cookies to make a “Red Velvet Whoopie Pie.” The soft, chewy texture with creamy filling is absolutely irresistible. It’s the kind of cookie you’ll want to serve at Christmas Themed Cake tables, Valentine brunches, or even wrap individually as edible gifts.
9. Make it your own.
If you love experimenting, fold in mini white chocolate chips for a bakery-style texture, or top each cookie with a dollop of frosting and a sprinkle of crushed red velvet crumbs from leftover Red Velvet Cupcakes. You can even dip one half of each cookie in melted white chocolate for a professional finish — a trick I use for bake sales and teacher gifts.
These cookies don’t just taste incredible; they look beautiful enough to grace any dessert platter. When I make them, my kids always sneak a few warm ones off the tray — because nothing beats the first bite of a freshly baked Redvelvet Cookies Recipe still warm from the oven.
Don’t forget to check out my Baking Mistakes to Avoid Guide — it’ll help you bake like a pro every time.
Tips, Serving & Storage
Storage: Keep cookies in an airtight container for up to 5 days at room temperature, or refrigerate for up to a week.
Freezing: Freeze unbaked dough or baked cookies (without frosting) for up to 2 months.
Serving Suggestions:
- Pair with a cup of cocoa for a cozy night in.
- Serve on a dessert board with Red Velvet Cupcakes and Red Velvet Desserts for a stunning holiday spread.
- Wrap individually with a ribbon for classroom treats or romantic gifts.
Variations:
- Add mini white chocolate chips for extra texture.
- Sprinkle crushed freeze-dried raspberries before baking for a tangy pop.
- For a Redvelvet Cookies Recipe twist, add a few raisins or nuts for extra chew.
If you’re planning a Valentine’s dinner, complement these cookies with my Homemade Whipped Cream Recipe — light, fluffy, and divine.
FAQ(s)
Q1: Can I make these cookies without cake mix?
Q2: How can I make these cookies chewy like New York Style Cookies?
Q3: Can I use natural food coloring?
Q4: Can I turn these into cookie sandwiches?
Conclusion
From Valentine’s treats to year-round celebrations, these Red Velvet Heart Shaped Cut Out Cookies are more than just a recipe — they’re a piece of our family’s story baked into every crumb. Each batch tells a tale of flour-dusted counters, giggling little helpers, and the sweet scent of cocoa drifting through the house on a chilly February morning. They remind me of how something as simple as a cookie can become the centerpiece of a memory — of love notes tucked into lunchboxes, surprise treats after dinner, and snowy afternoons spent baking just for fun.
Every time I cut out those little hearts, I think of my mom teaching me how to bake, her gentle hands guiding mine through the dough. Now, I watch my own kids do the same — rolling, cutting, and laughing over who made the “perfect” heart. These cookies aren’t just for Valentine’s Day; they’re for any day that needs a little extra sweetness. Whether you serve them at a cozy family gathering, wrap them up for a friend, or sneak one warm from the pan, they’re guaranteed to bring a smile.
Simple ingredients, heartfelt memories, and that deep red hue — this recipe is everything I love about baking. It’s not about perfection; it’s about creating something meaningful. So, next time you need a reason to celebrate love — in all its forms — bake a batch of Red Velvet Heart Shaped Cut Out Cookies. Share them with the people who make your life warm, bright, and a little more delicious.
For more inspiring recipes, follow us on Pinterest

Emily brings four years of dedicated baking experience and professional pastry-focused training to Moms Meals Daily. She oversees recipe validation and quality control to ensure every dessert performs consistently and reliably.
Victoria Recipe | Easy Desserts & Dessert Recipes
Easy & Delicious Recipes
Follow for quick family-friendly recipes, baking inspiration, and comfort food favorites.
Follow on Pinterest